Clients
Clients overview
A tour of Clients — where every customer's contact details, job site, jobs, and billing history live in one place.
Clients is your customer book. Every business or individual you work for lives here, along with their contact details, their job site, and a running history of every job, quote and invoice tied to them. You can bring your whole list in at once with an import, or add customers one at a time as new work comes in — and from any client's page you can start a job, take a payment, or raise a quote or invoice without leaving it.
Step 1 — The Clients list at a glance
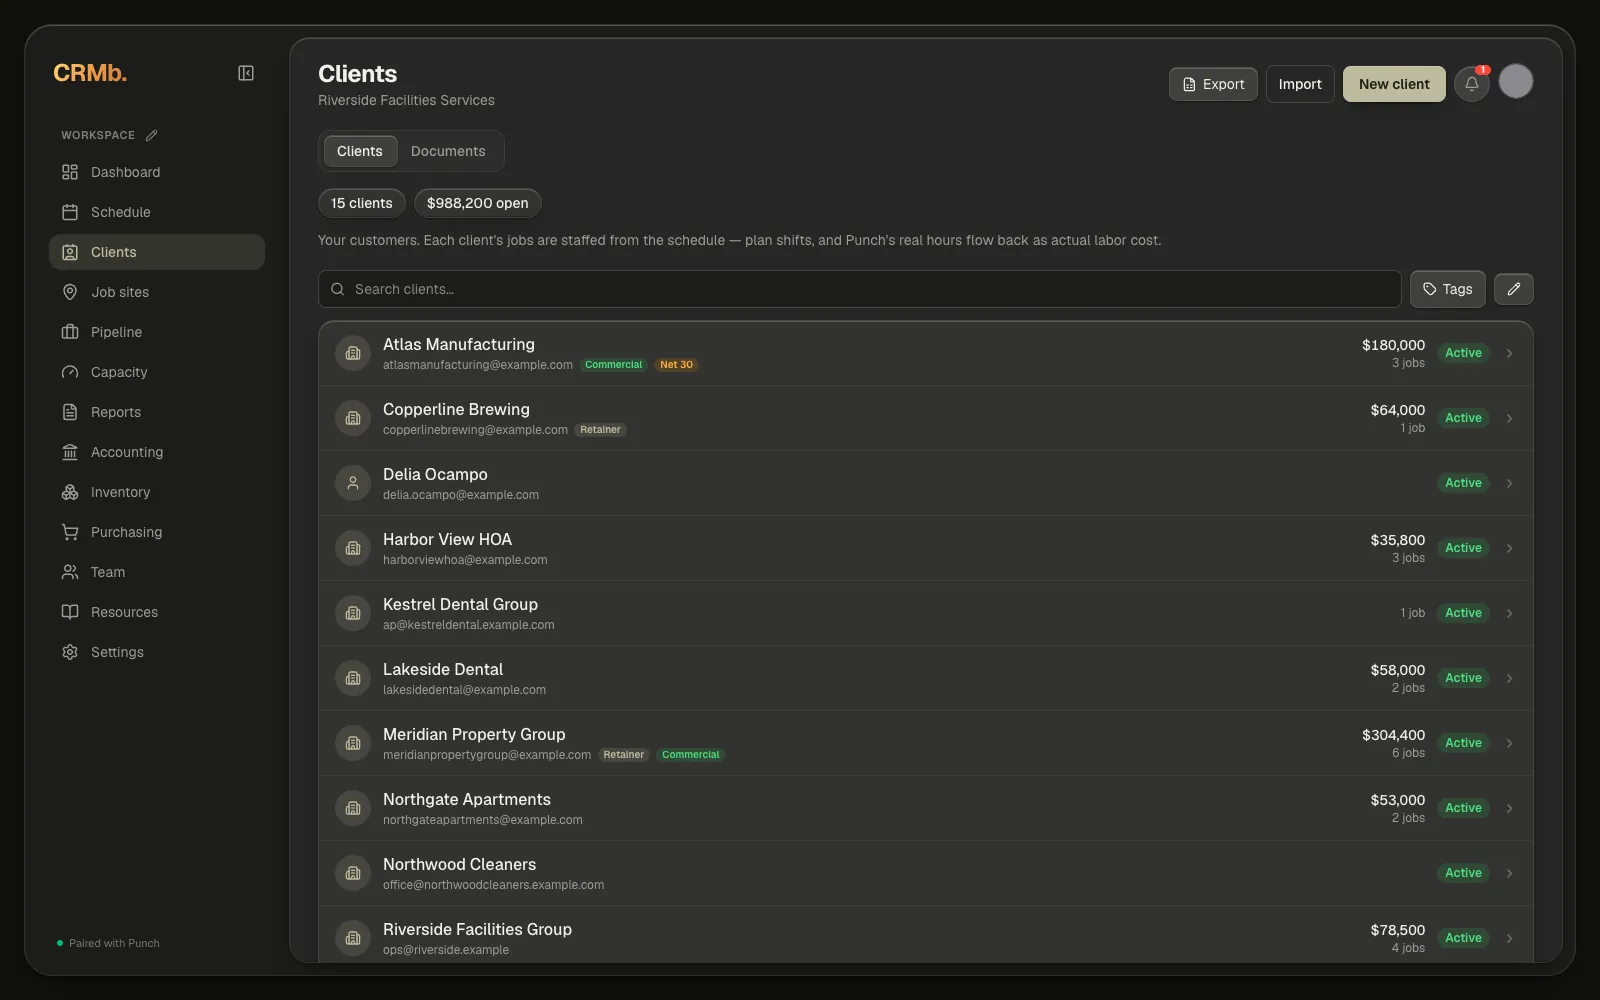
Two tabs sit at the top of the page: Clients, the book itself, and Documents, every quote and invoice you have written in one list. Chips above the list count what you are looking at — how many clients you have, and, once there is any, what is open across all of them.
Each client is one row: their name, the first way you have to reach them, any tags you have put on them, what their open work is worth, how many jobs they have, and whether they are a lead, active or inactive.
The search box filters the list as you type and Tags narrows it to a tag. The pencil at the right end of that same row starts selecting — tick the clients you want, then use the delete button that appears, Select all, or Done to come back out.
At the top right you will find Export, Import and New client. Export and Import are for owners and managers. Export hands you an Excel workbook of exactly the clients showing — if you have searched or filtered by tag, that is what you get.
Step 2 — Add a client one at a time
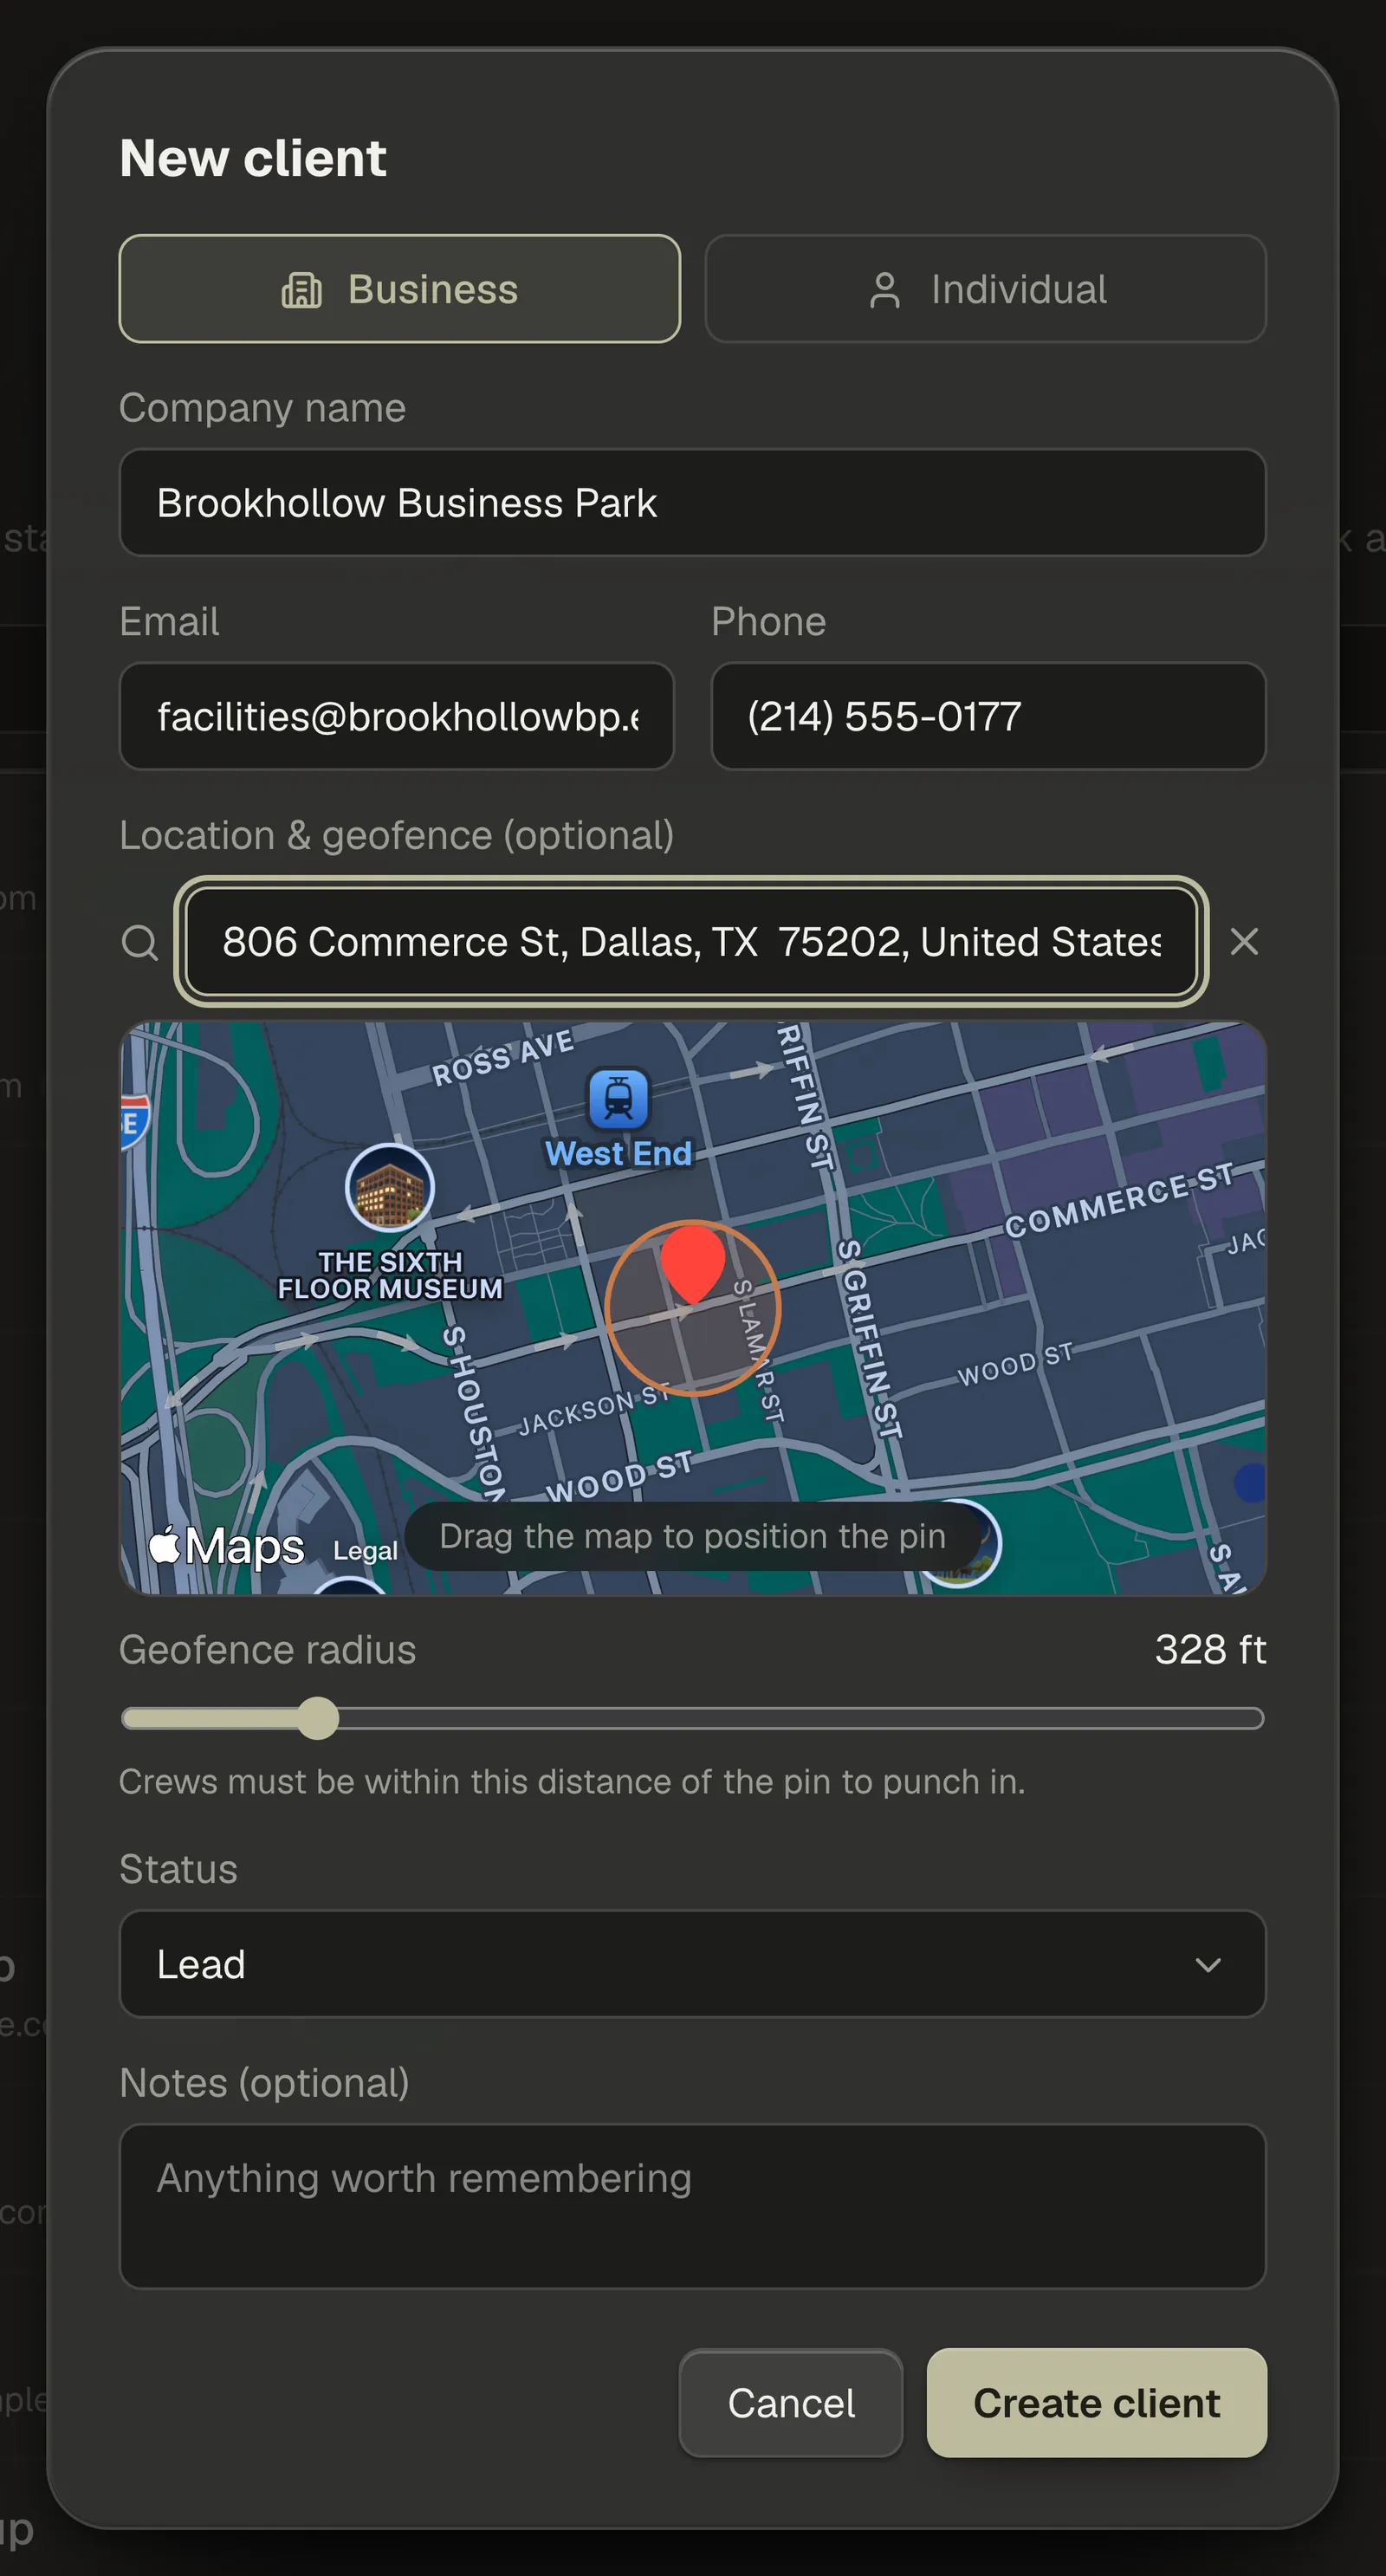
Click New client at the top right. Choose Business or Individual, then fill in the name, email and phone.
Under Location & geofence (optional), search for the address. The pin is fixed to the centre of the map, so you drag the map to position the pin rather than dragging the pin — wherever it lands is the centre of the job site. Then set a Status, add anything worth remembering under Notes (optional), and click Create client.
If what you have typed looks like somebody already in your book, CRMb says so before you save and links you to the match. You can still create the new client.
That pinned location does two jobs. It plots the client on the map on their page, and it keeps a job site in step with the address — so the client is schedulable right away, and punchable in Punch if your crew punches. On an org paired with Punch you also get a Geofence radius slider under the map, which sets how close a crew has to be to punch in. On a CRMb-only org there is no radius, because the geofence is Punch's.
Step 3 — Import your whole client book
If you are bringing a full customer list over, click Import at the top right of the Clients page. Four steps run across the top of the wizard: Upload, Match columns, Preview and Done.
Download the template first if you are starting from scratch — it carries a column for everything a client can hold: Name, Kind, Email, Phone, Status, Address and Notes. Only Name is required, and Kind and Status are dropdowns so their values cannot drift. Any .xlsx or .csv with a header row works too, up to 1,000 clients per file; the next step matches your columns to CRMb's.
Preview counts four things before anything is written — New clients, Already exist, Warnings and Skipped rows — lists the first eight new clients, and puts a reason against every flagged row under Row notes. Only the new ones import.
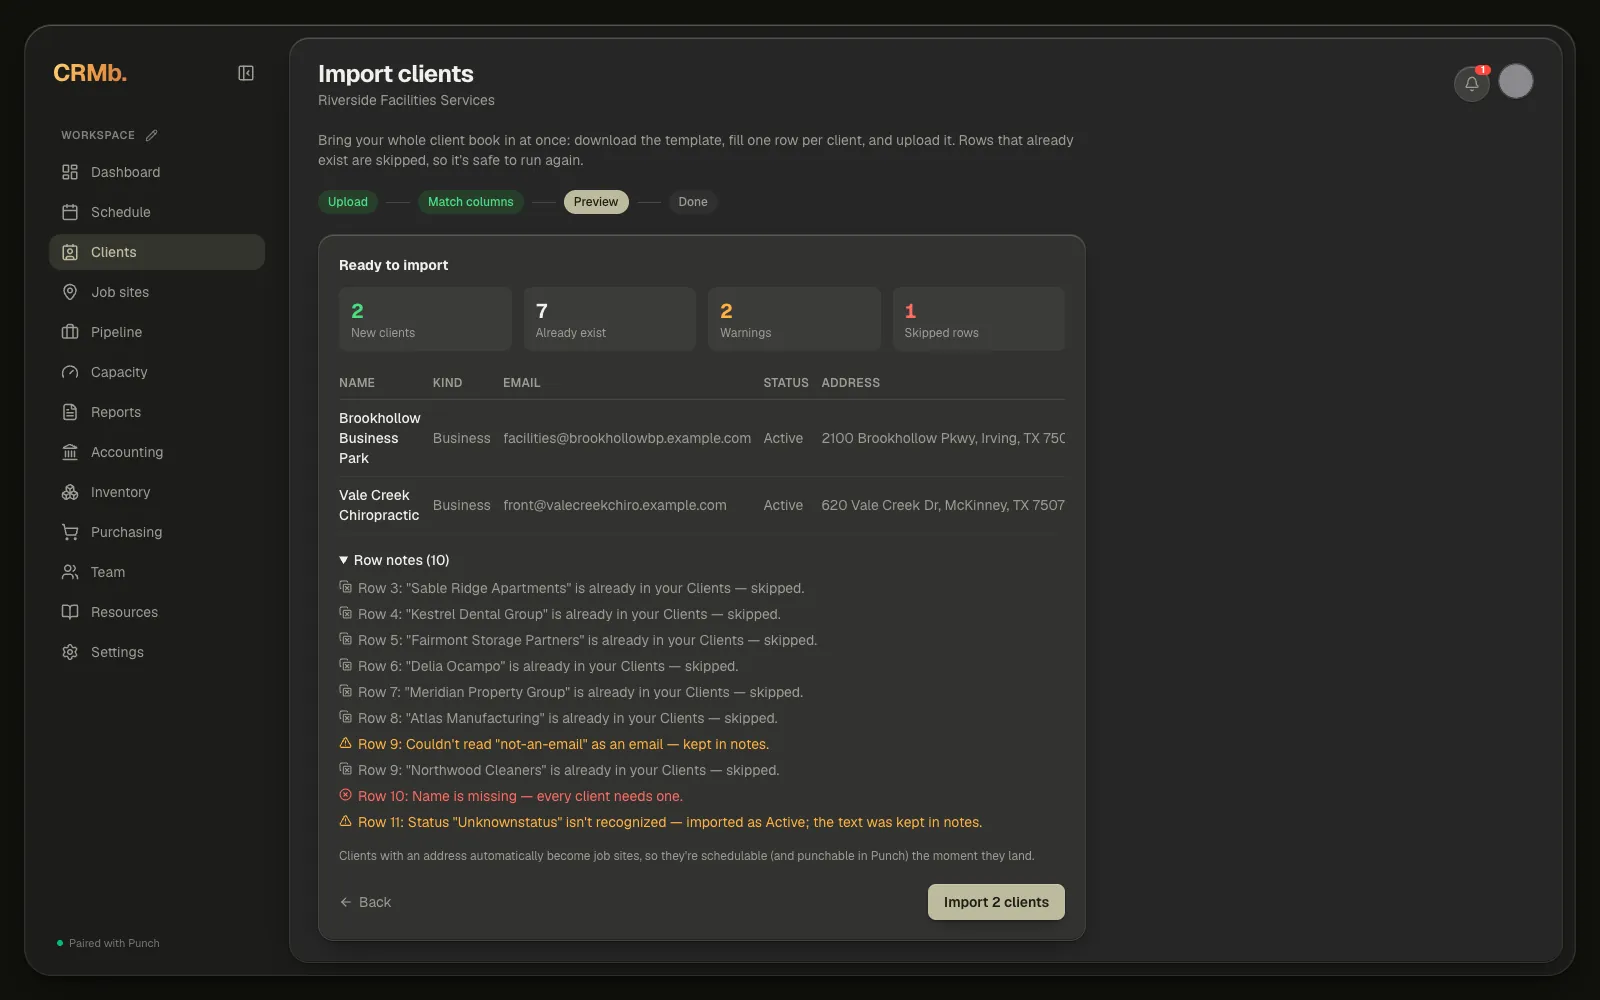
Note — Rows that already exist are counted under Already exist and left alone, so running the same file again is safe if you are not sure what made it in. Any client with an address becomes a job site as it lands, so they are schedulable the moment the import finishes.
Step 4 — A client's full profile
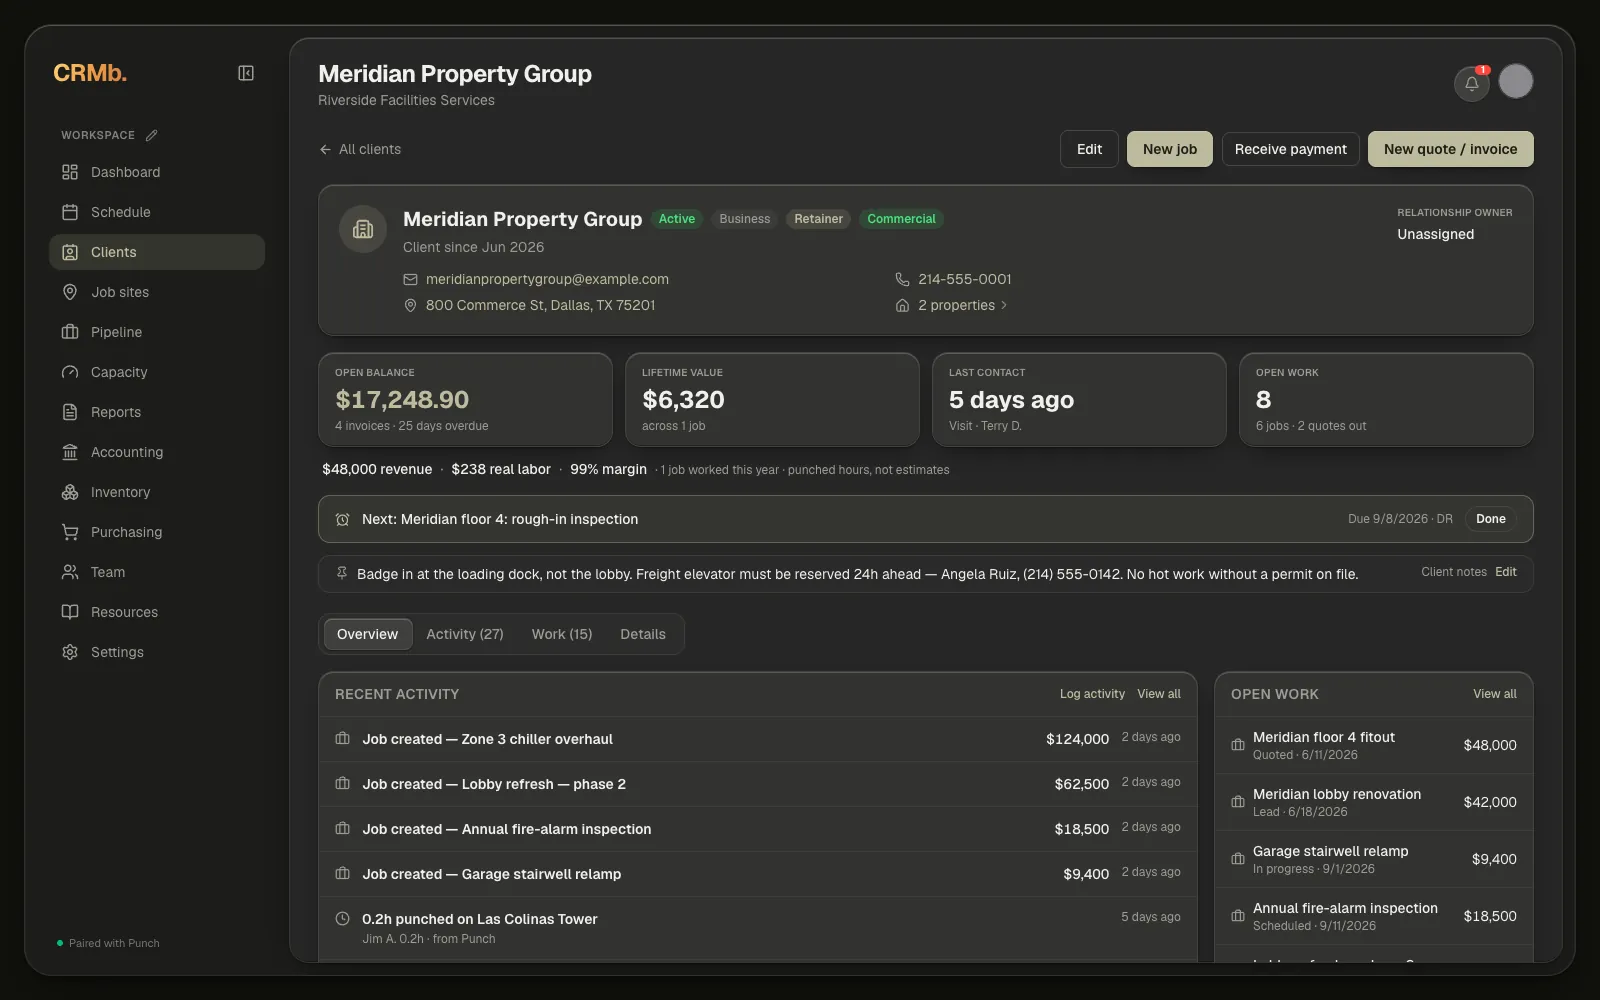
Click into any client. A header card carries their contact details and status, four tiles read Open balance, Lifetime value, Last contact and Open work, and below them sit the next thing due and any note you have pinned.
Four tabs organise the rest. Overview is the recent activity plus a rail of what is open, Activity is the whole history, Work is their jobs, documents, payments and scheduled work, and Details is the record itself — the contact rows, who owns the relationship, the tags, the map, their properties, and the client notes.
Across the top: Edit, New job, Receive payment and New quote / invoice.
Note — The map is on the Details tab, under the client's record. It is not above the tabs.
Step 5 — Log activity, and talk about it
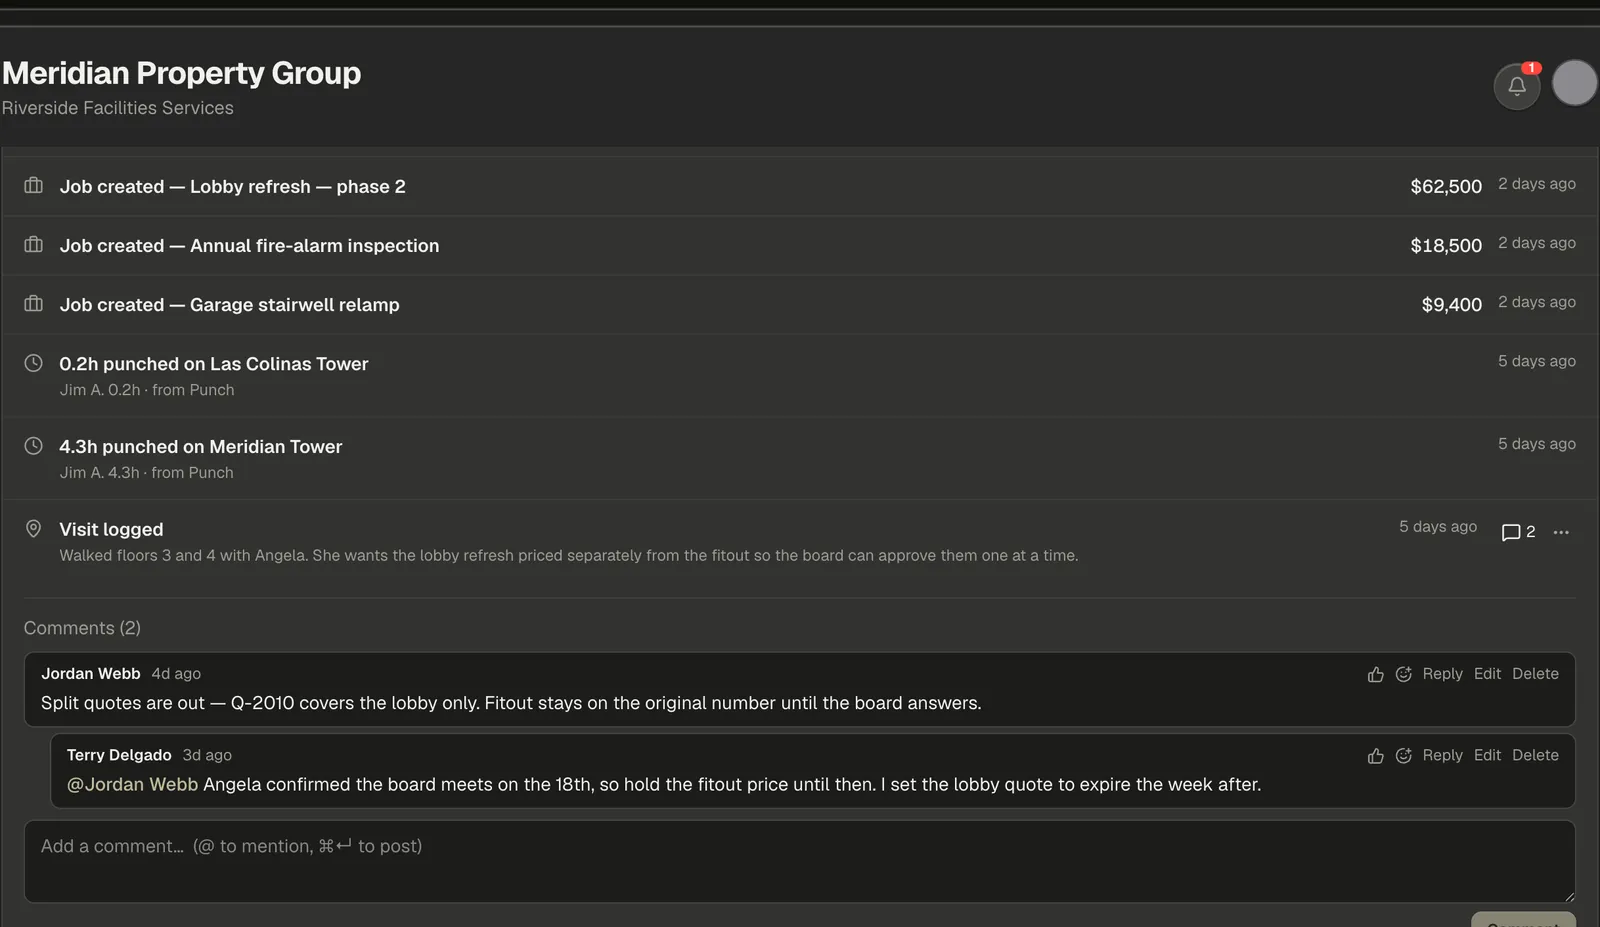
Log activity on the Recent activity card records a Note, a Call or a Visit against the client, with the date and time it happened and what was said. Tick Pin to the top of this client to keep it in front of you. Typing @ in the box tags a teammate and tells them.
Every logged row opens a comment thread from the speech bubble beside it, so anyone on the team can reply — and @ works in a reply too. The row's own menu edits the note, pins it, or deletes it.
Step 6 — Create a job for a client
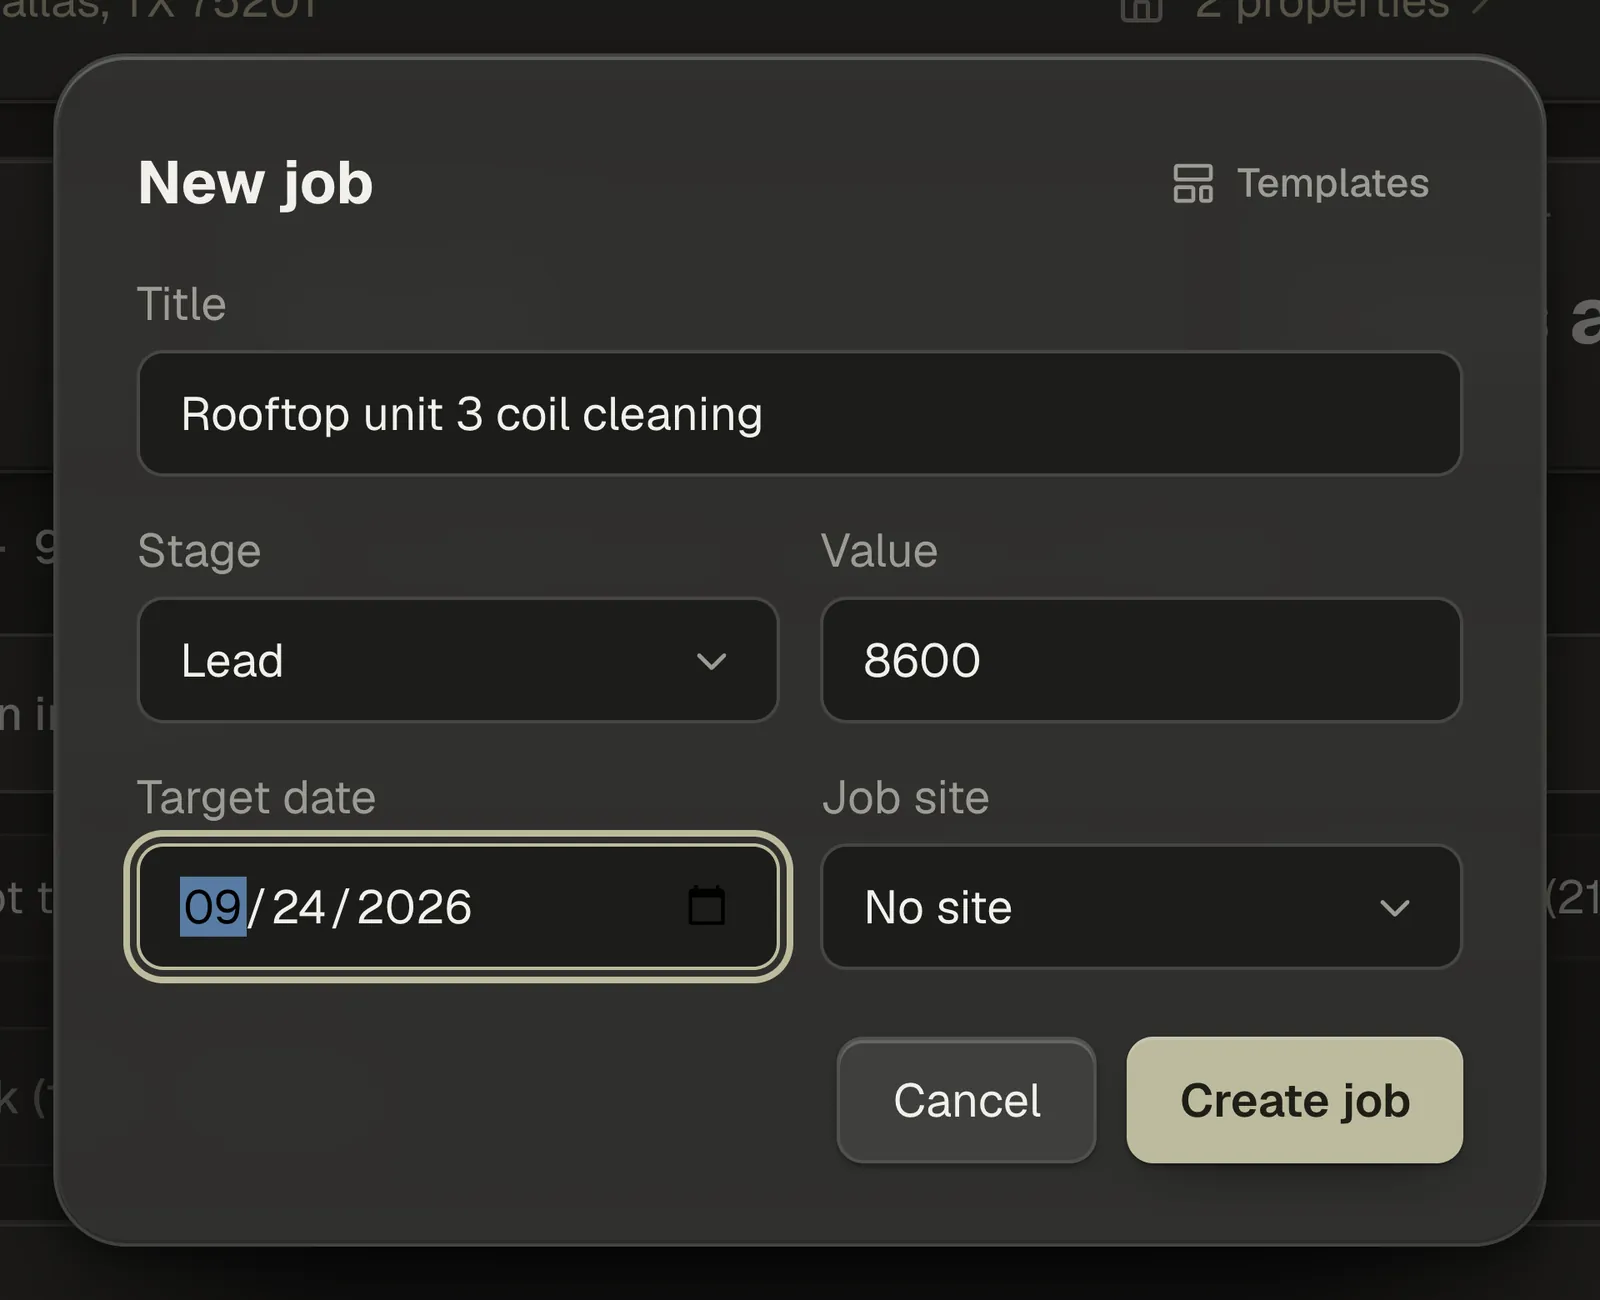
Click New job. Give it a Title, pick a Stage and a Value, set a Target date, and choose the Job site — or No site, or add a new site on the spot from the same picker, which then selects it for you. Click Create job.
The window closes and you stay on the client. The new job shows up under their Work tab and on the Pipeline board; open it there to do the real work on it. The job's own page carries Scope of work, scheduled work, tasks, Materials and notes down the left, with the crew and the money — the value, projected and punched labor, materials cost and bank spend — down the right. Everything the client already has, from their contact details to the site address, comes with it.
Note — The Stage picker at the top of the job's own page is what moves the job forward. That stage drives the status you see back on the client's page and on the Dashboard.
Step 7 — Receive a payment
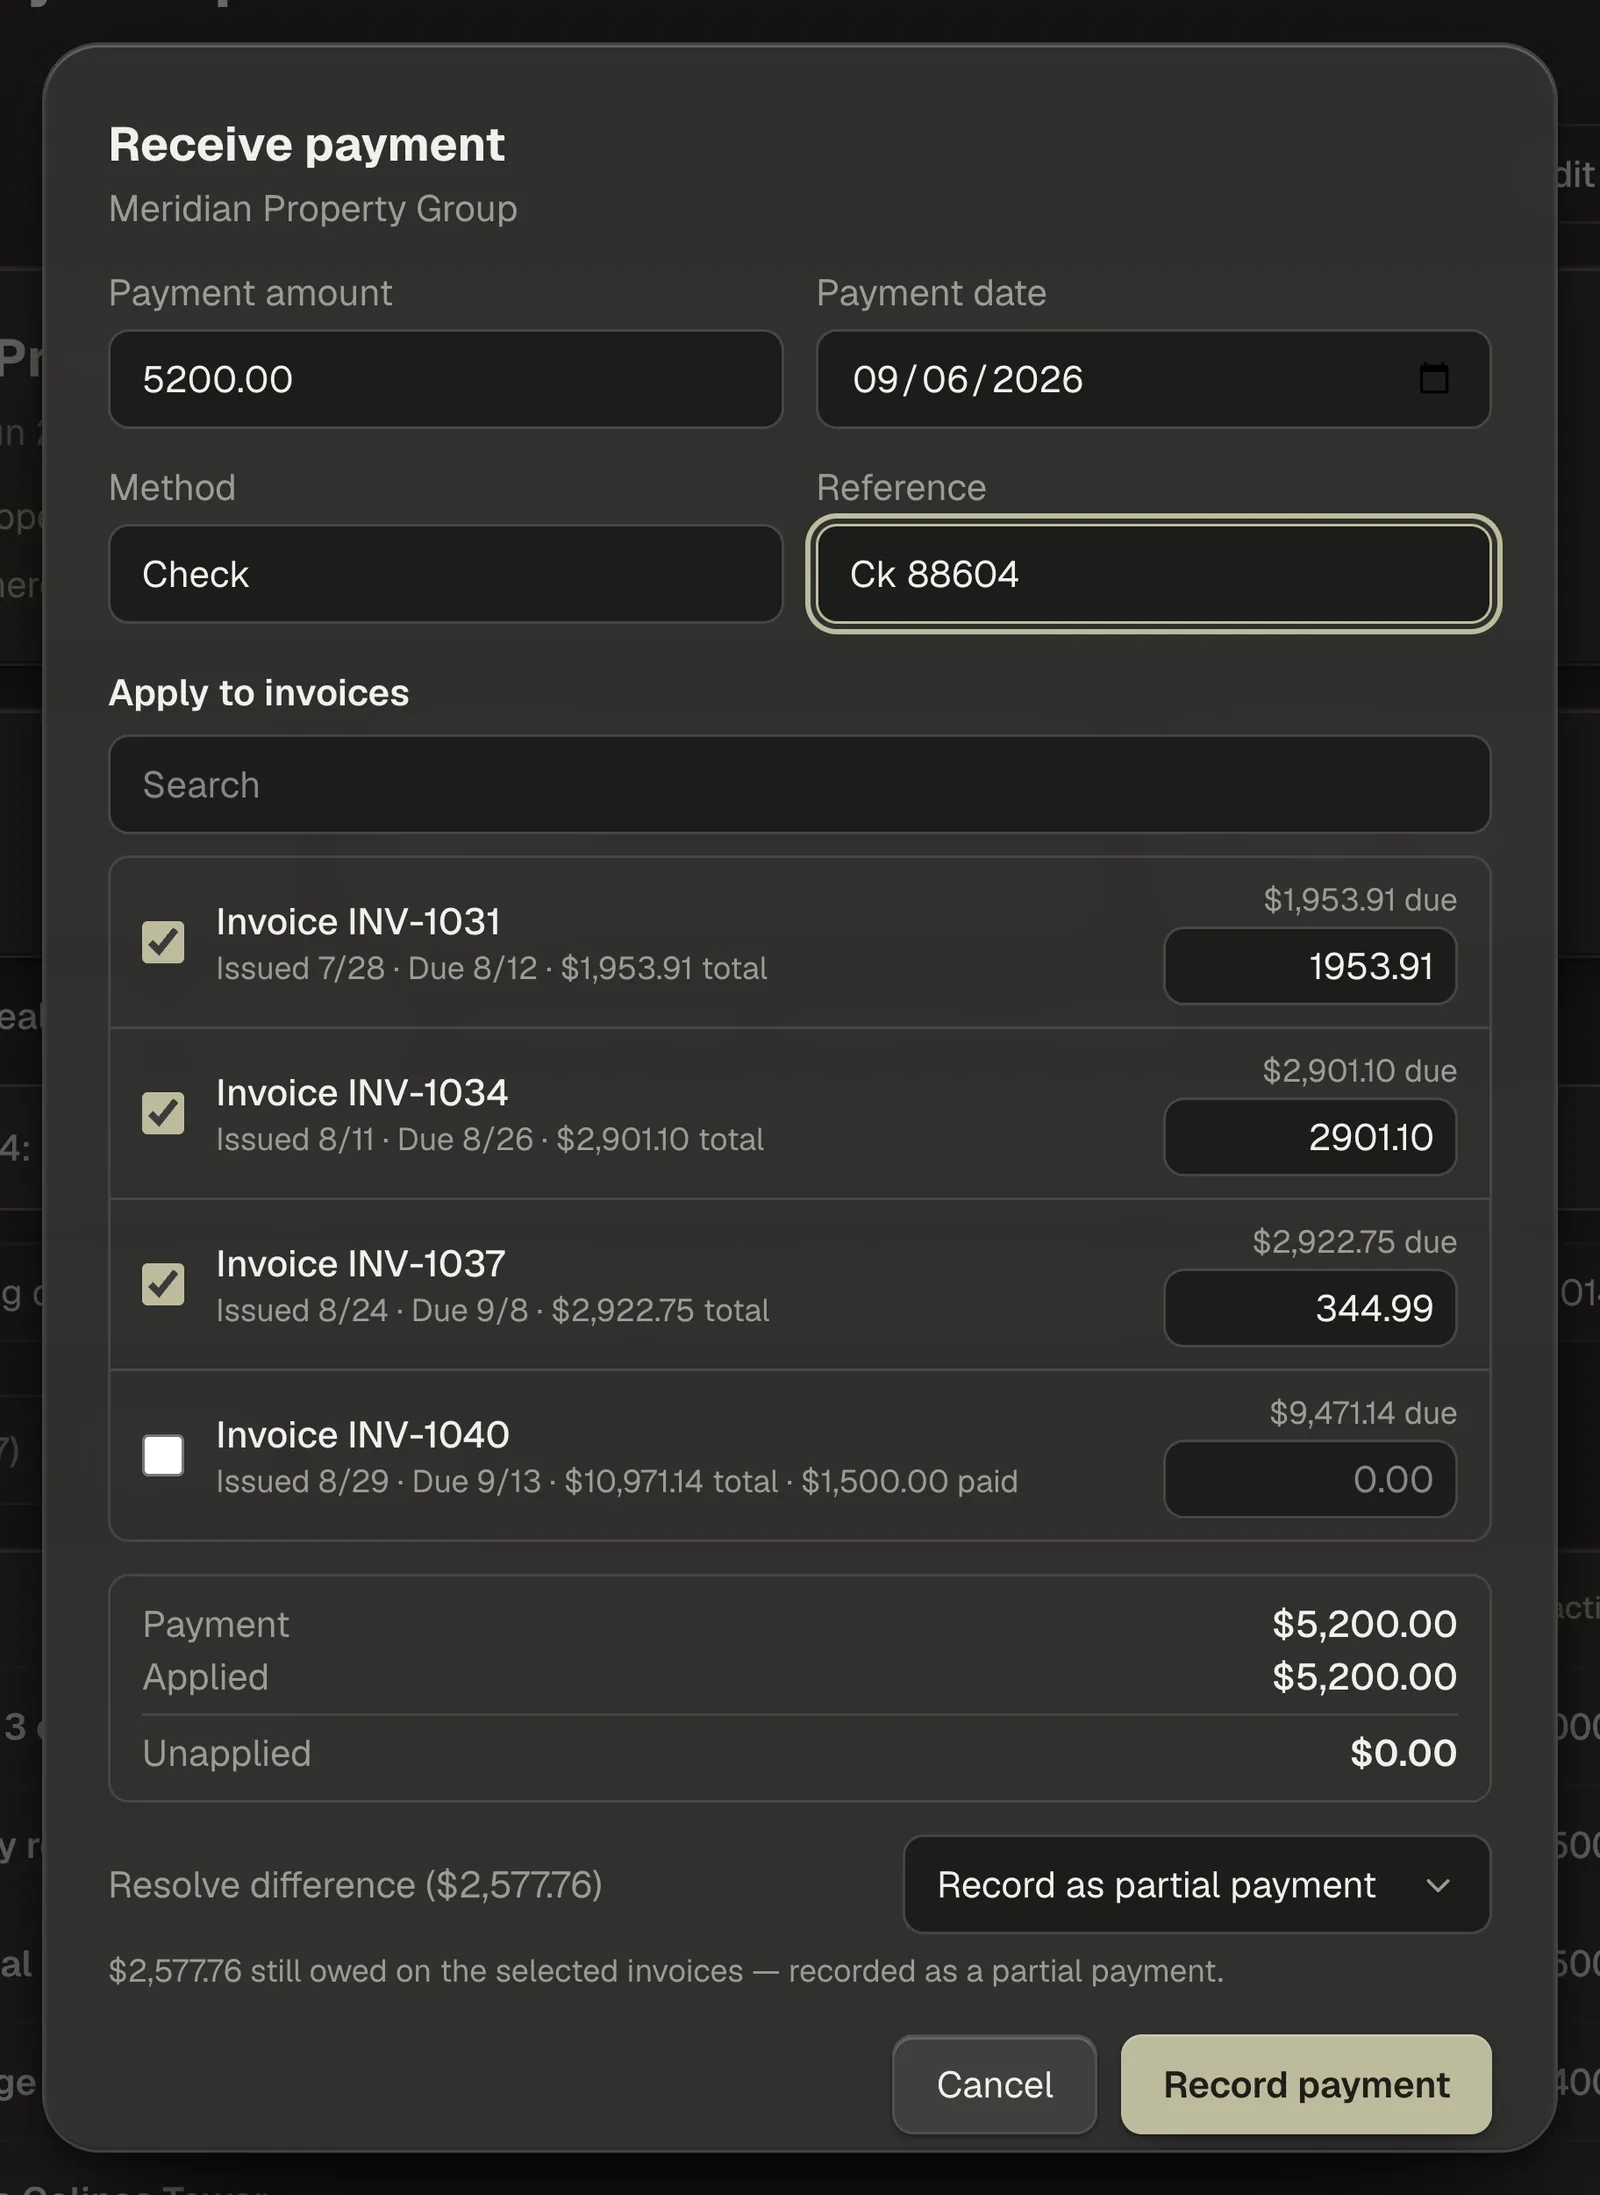
Click Receive payment to log money coming in without raising an invoice for it first. There are four fields: Payment amount, Payment date, Method, and Reference — a check number or a transfer ID. If you apply less to an invoice than it still owes while part of the payment is left unapplied, the window names the shortfall and offers Apply the rest — the payment cannot be recorded with its own invoice left short.
Under Apply to invoices, CRMb spreads the money across the client's open invoices oldest first the moment it knows the amount. Every row stays editable, and once you have typed over one by hand the auto-fill leaves it alone. The search box above the list drops down every open invoice to pick from and narrows the list as you type.
Payment, Applied and Unapplied update live underneath as you go, so one check can settle several invoices at once, or part of it can sit unapplied.
If the money falls short of the invoices you ticked, Resolve difference appears: record it as a partial payment, which is the default, or file the shortfall as Merchant/Processing Fees or to any of your own categories. If there is money left over, Resolve as either leaves it as a credit on the customer's account — Leave as a credit — or files it as income under a category you pick. Record payment writes it.
Note — There is no note field on this form on the web; the Mac and iPad apps have one. Method and Reference are where a check number or a card reference belongs.
Step 8 — Start a quote or an invoice
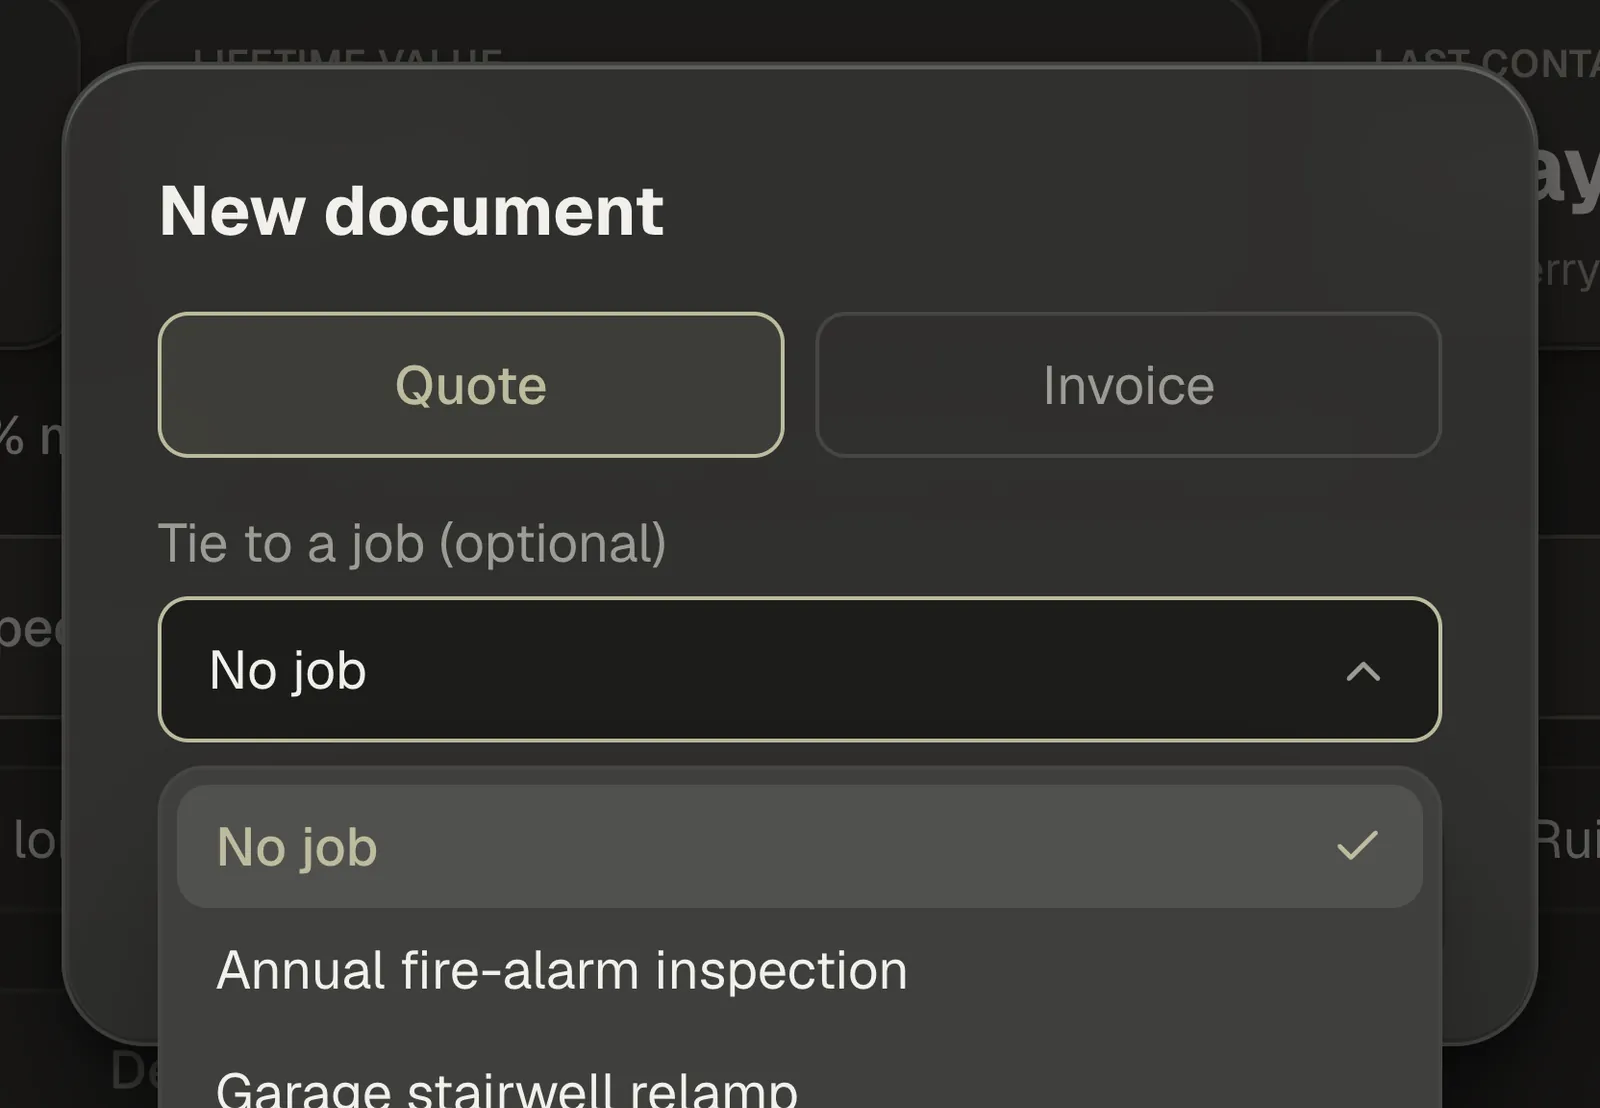
Click New quote / invoice. A small window titled New document opens: pick Quote or Invoice at the top, and if this client already has jobs you can point the document at one under Tie to a job (optional) — or leave it on No job. Click Create and you land in the editor.
Tying the document to a job is what lets it pull that job's real punched hours and its materials in the editor.
Note — Quotes have their own walkthrough. Send a quote to a client runs the whole thing, from a blank quote to an accepted one turned into an invoice.
Step 9 — Build and send the invoice
The invoice opens with the client already billed to, your business details filled in, and the next invoice number — they run INV-1001, INV-1002, and on — along with the default terms, tax rate and notices you set in Settings.
Everything you can do to the document is visible on the page, not hidden behind a menu. Above the lines: Add line, Clear all lines, Pull Punch shifts for the real hours your crew punched, and Pull materials for what the job used. Under them, the discount, the tax and any Deposit req. roll into the totals as you type.
Down the right side: the Status — Draft, Sent, Paid or Void — then a Payments card with its own Receive payment button, then Save and View / Print, then Send to client, and last Templates, Duplicate and Delete.
- Send to client — emails the invoice and mints the link your customer opens, with no login needed on their end. Once it has gone out at least once, Copy link and Revoke appear underneath it; Revoke disables a link that is already out there.
- Sent and Viewed — a sent invoice shows the date it went and the date the client opened it. Mark as not sent clears that record and returns the document to a draft. It does not recall the email; nothing can.
- View / Print — saves your work first, then opens the finished document. Print it, or use your browser's print window to save it as a PDF.
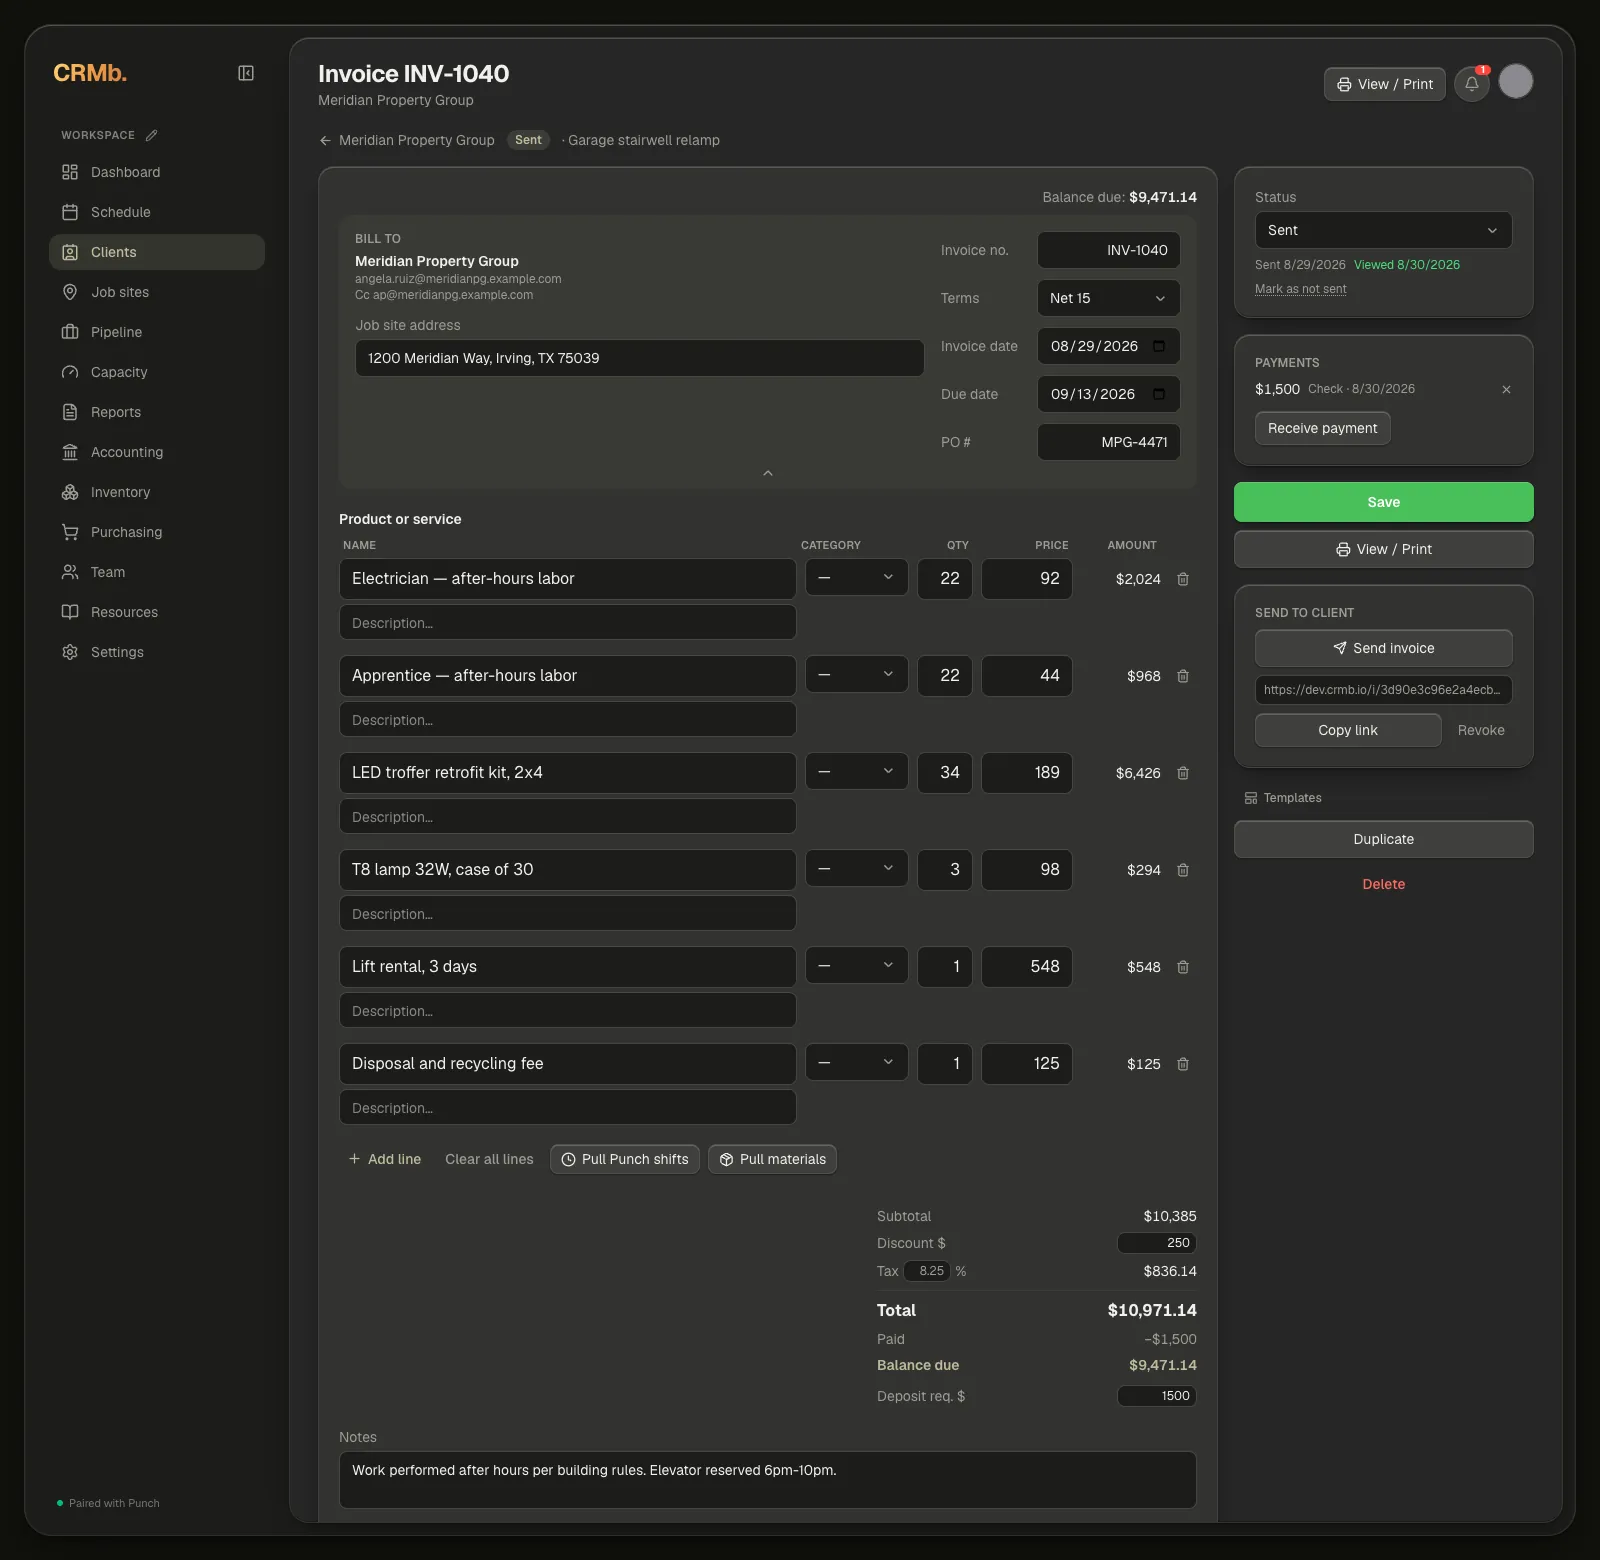
Note — There is no Download PDF button on the web. View / Print plus your browser's print window is how a PDF gets made; the Mac and iPad apps have the download.