Schedule
Scheduling a week
Planning the crew's week — drafting shifts, publishing them to the team, and watching what they cost before you commit.
Schedule is where the week gets built. You lay shifts onto a calendar — day, week, or month — assign each one to a person or leave it open for whoever wants the hours, and tie it to the client, job, and job site the work belongs to. As you build, the page keeps a running total of scheduled hours and, if you're an owner or manager, what those hours will cost once overtime is figured in. Shifts start as drafts that only you can see, so nothing reaches the crew until you publish. After the work happens, the same page shows what was actually worked against what you planned — hours flow back automatically from Punch for anyone who punched in, and you can fill in the rest by hand.
Step 1 — Open Schedule and pick a view
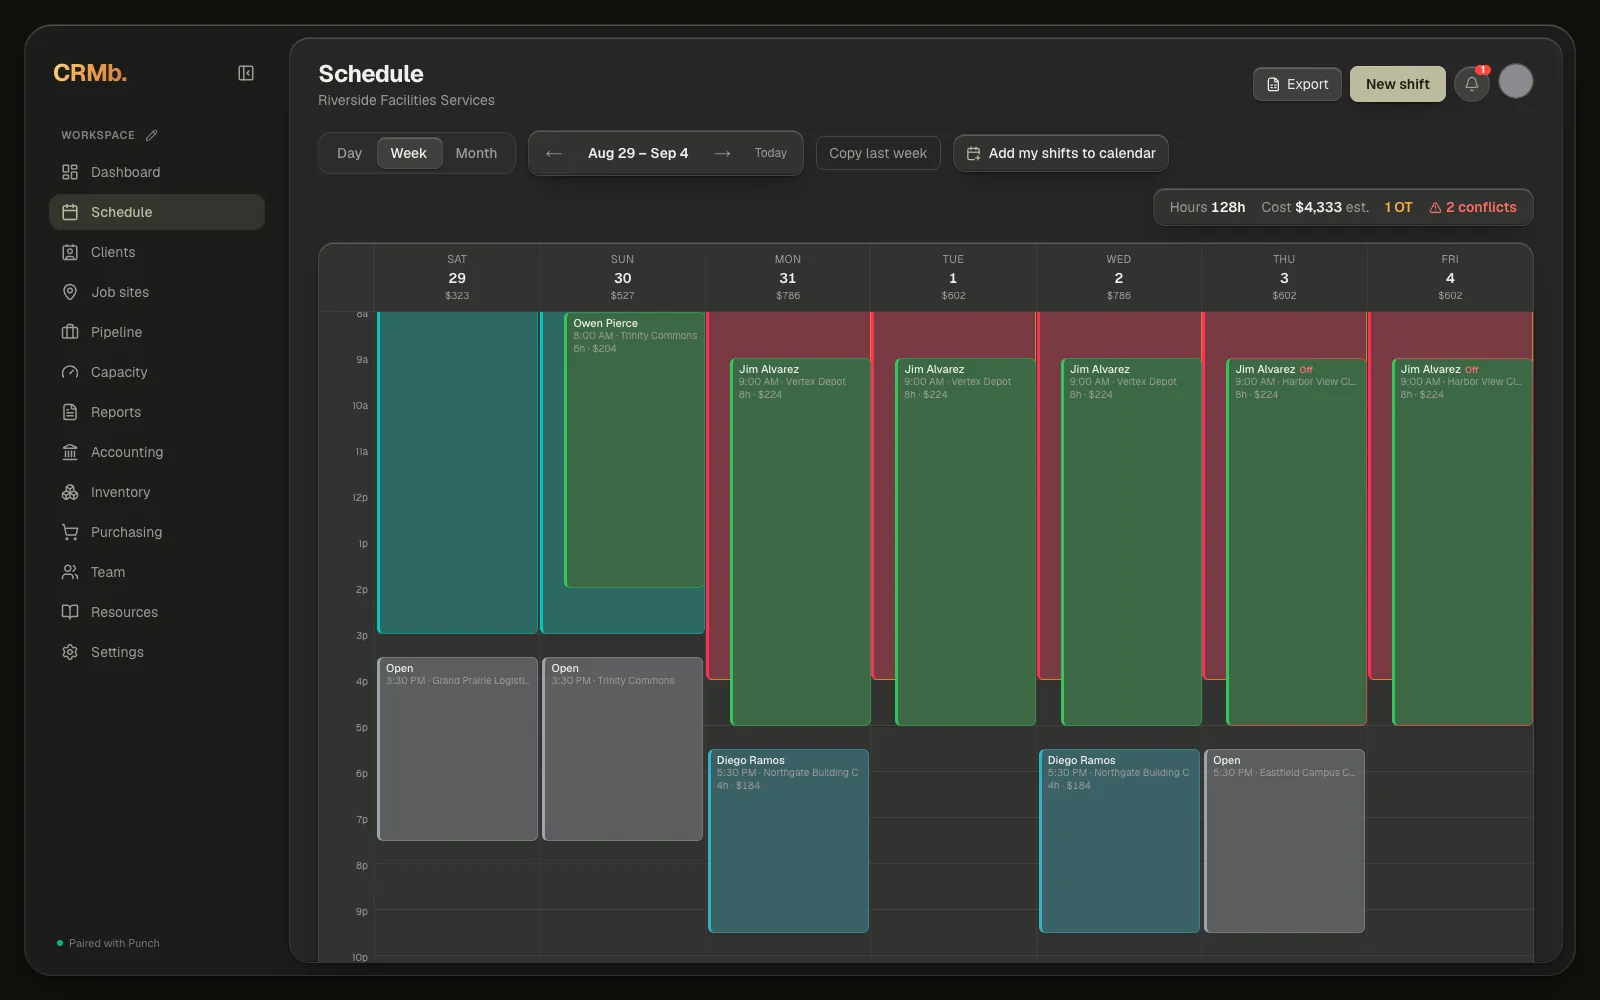
Schedule is in the left sidebar. Day, Week and Month sit at the top left, and the arrows beside them move you a period at a time — one day, one week, or one month, depending on which view you're in. The label between the arrows tells you where you are, and Today brings you back.
Week is the working view. Month is for seeing the shape of a month at a glance, and Day is for a single busy site.
Step 2 — Read the week at a glance
The chip on the right of the toolbar totals the period you're looking at, and each block on the calendar tells you most of what you need without opening it.
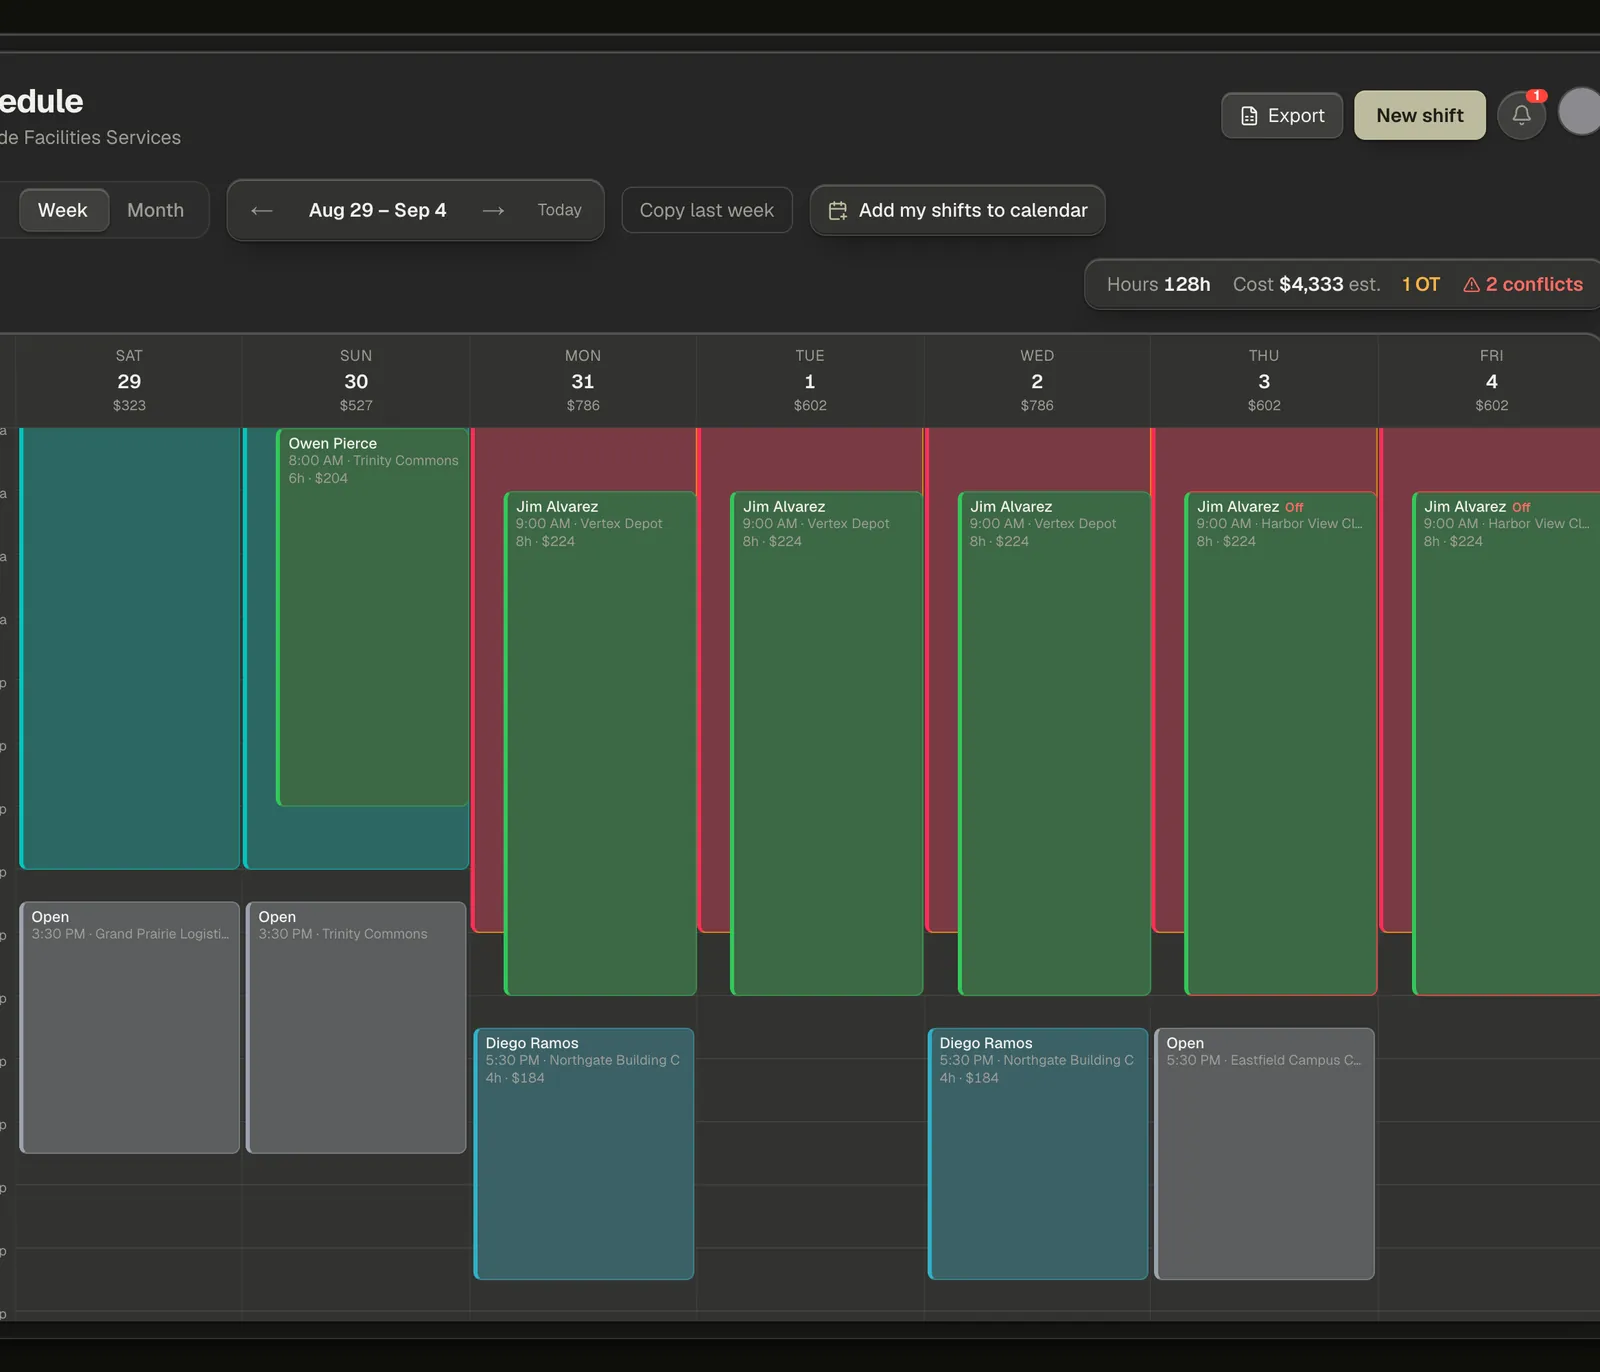
- Hours — every shift in view that hasn't been cancelled, added up. Everyone sees this figure.
- Cost — those hours priced from each person's pay rate with your overtime policy applied, marked est. because it's a projection, not a payroll figure.
- OT — how many people in this week cross into overtime. It shows in Day and Week view; Month view doesn't carry it.
- Conflicts — a red count appears when someone is scheduled on time off they've already had approved. Click it for the Scheduled while off list, and click a name there to open that shift.
- On each block, the coloured bar down the left side is the person — the same colour everywhere they appear that week. An Off badge means the shift lands on their approved time off; an OT badge means that person is already into overtime. Cancelled shifts stay on the calendar, greyed out.
If anyone assigned that week has no pay rate on file, a line under the toolbar reads Some assignees have no pay rate set — est. labor is understated. The cost figure is still shown; it's just missing that person's share.
Note — Cost and overtime are only shown to owners and managers. Everyone else sees the schedule and the hours, never the money.
Step 3 — Add a shift
There are three ways in, and all three open the same composer with the date and time already filled:
- New shift, top right.
- Double-click an empty slot in a day column.
- Press and drag down an empty column to draw the span you want.
Step 4 — Fill in the composer
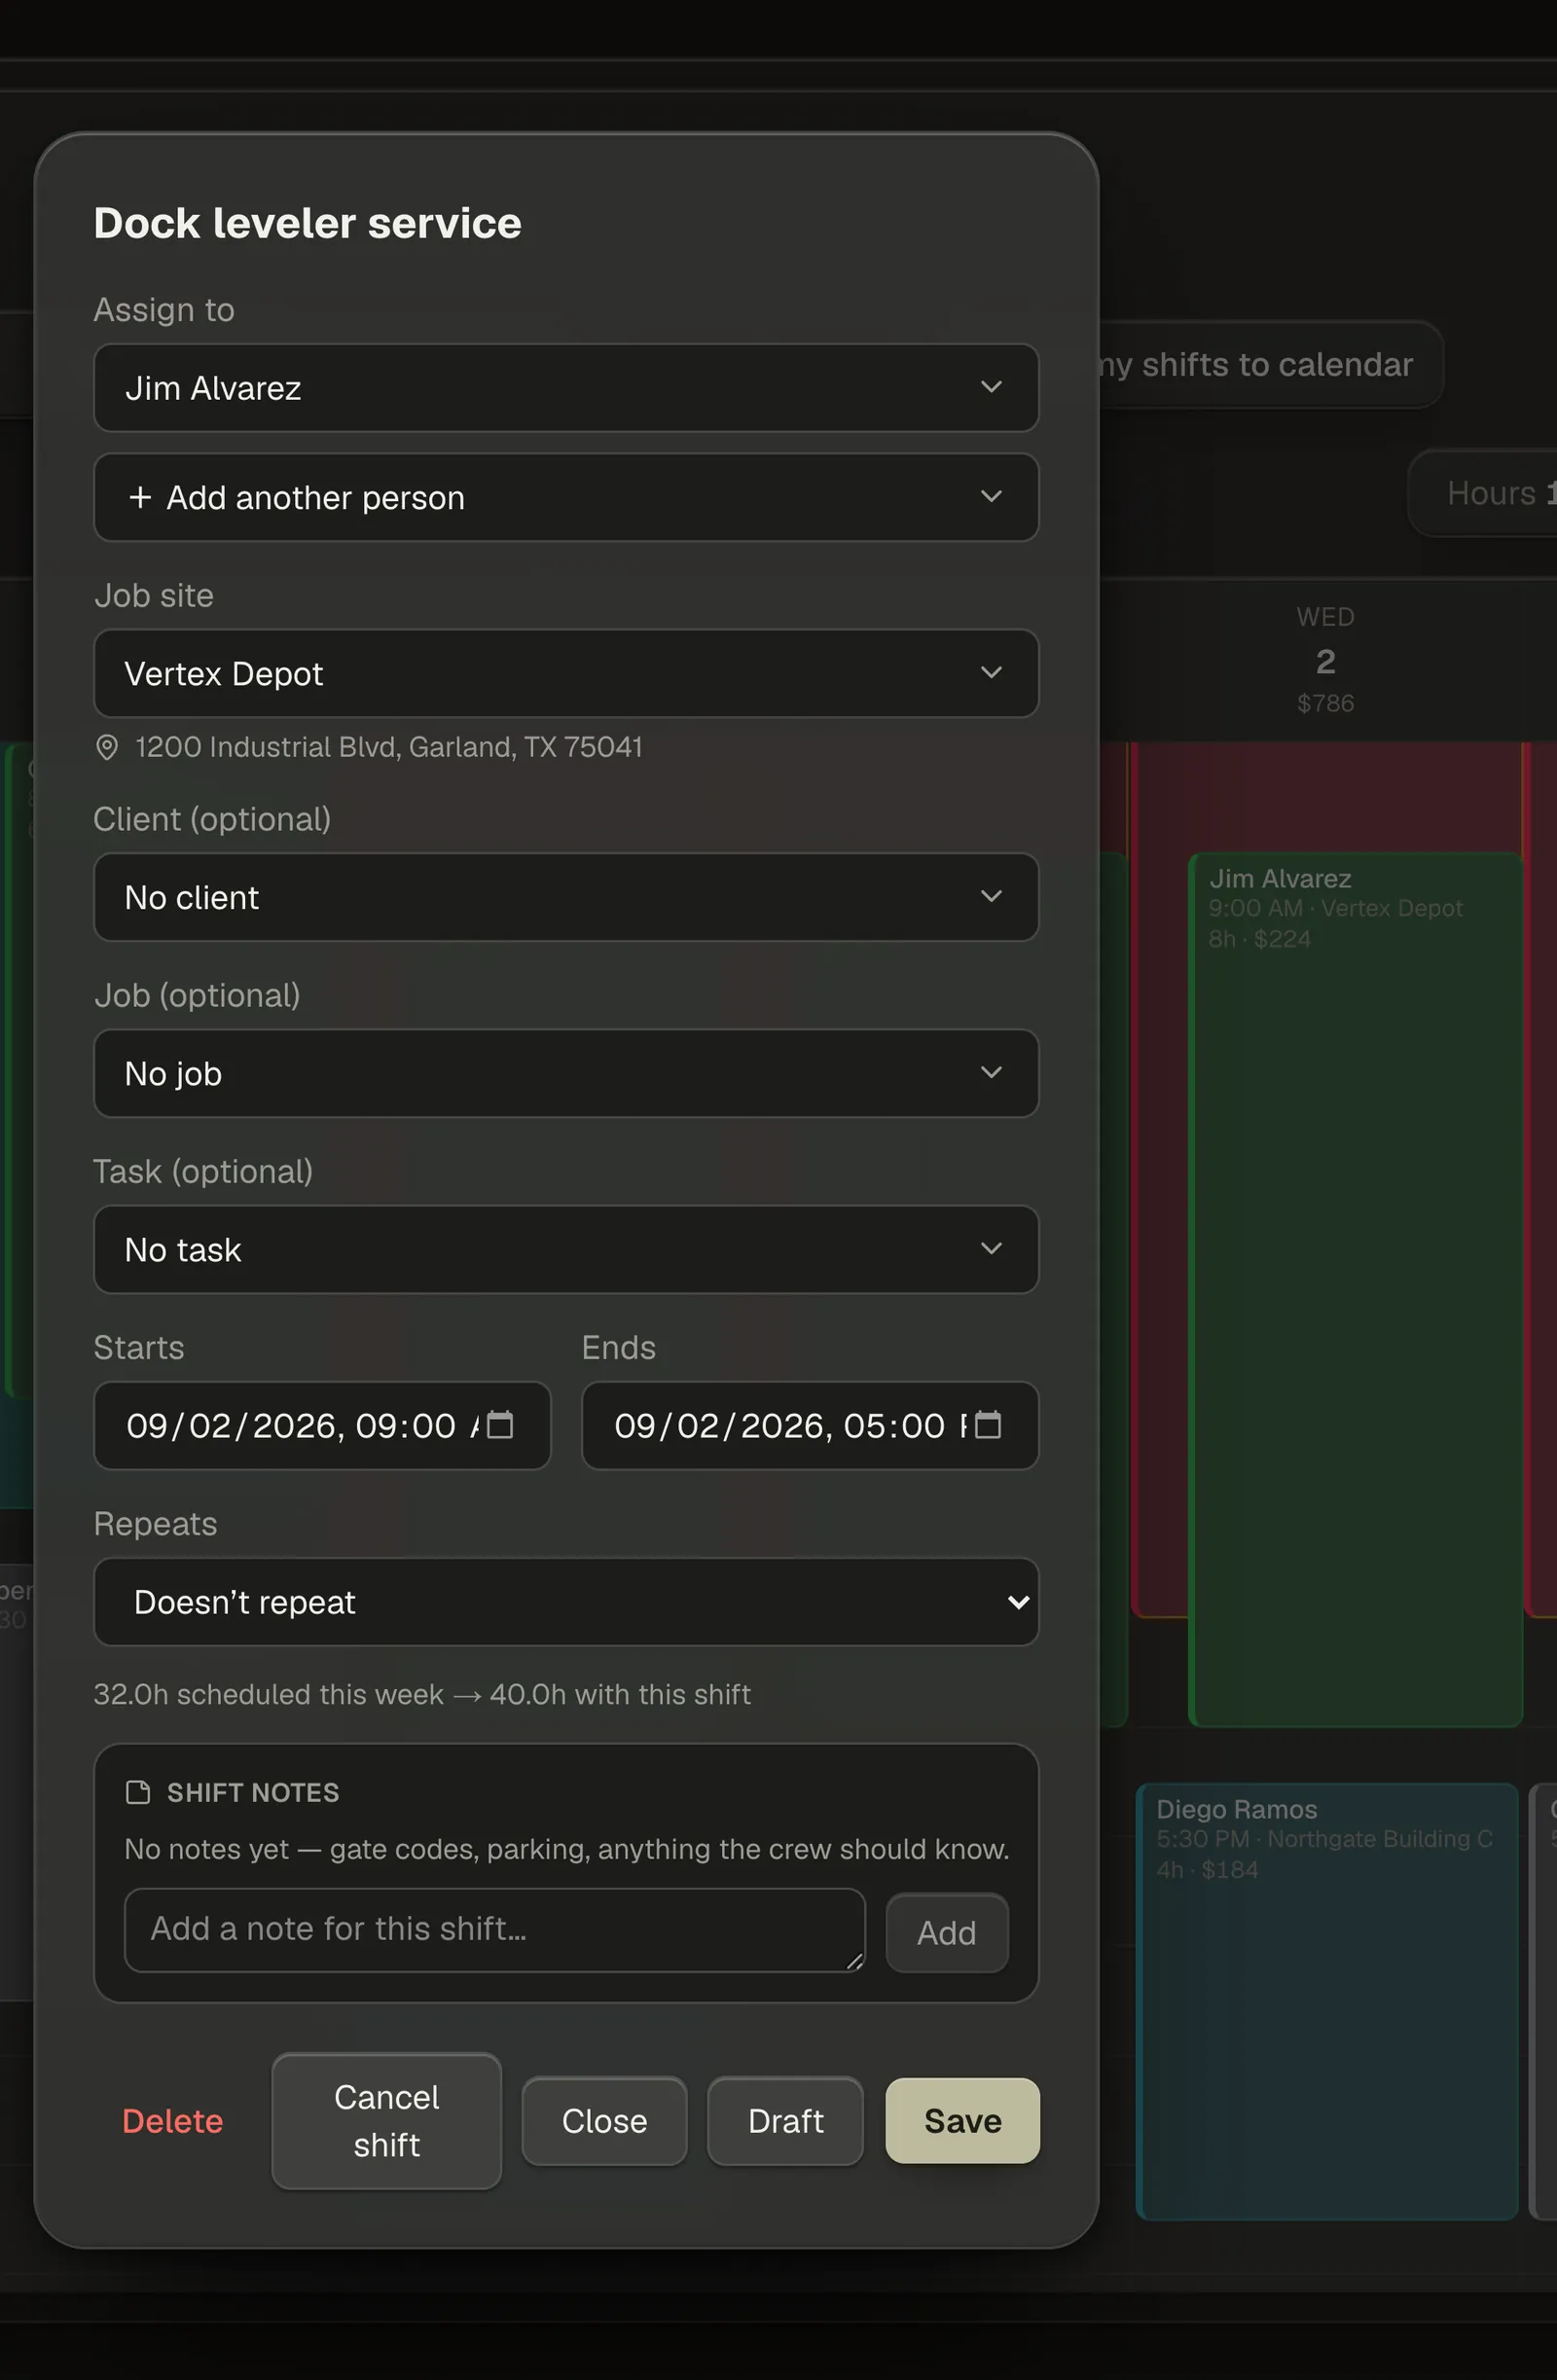
The fields run down the window in this order.
- Title — what the shift is. It's the ghost text at the top reading New shift, and Shift title when you reopen a saved one. Optional, but it's the first thing the crew reads.
- Assign to — pick a person, or leave it on Open shift (unassigned) for anyone to claim. The list is grouped: Members are the people with a login, Roster are the people you only track for scheduling and pay. Roster people don't need a CRMb login and don't add to your bill. If the job you pick has a crew on it, the groups change to Crew on this job and Everyone else, with the project manager first.
- + Add another person — puts more people on the same shift. Each one saves as its own copy with the same times, site and job, so you can move or cancel them one at a time afterwards.
- Job site — the address the crew punches in at. + Create new site makes one without leaving the composer, and the address that appears underneath a chosen site opens straight into maps for directions. No site leaves it blank.
- Client (optional), Job (optional) and Task (optional) — the links that make this shift's hours count toward the right work. Picking a client narrows both the Job (optional) list and the Job site list to that client's, so you're choosing from a short list instead of everything you own.
- Starts and Ends — Ends fills itself in as nine hours after Starts and keeps doing that until you change it yourself. After that it stays where you put it.
Note — Job sites are shared with Punch — the site you pick here is the same geofenced address the crew punches in at. Adding a shift never changes where someone is allowed to punch.
Step 5 — Repeat a shift
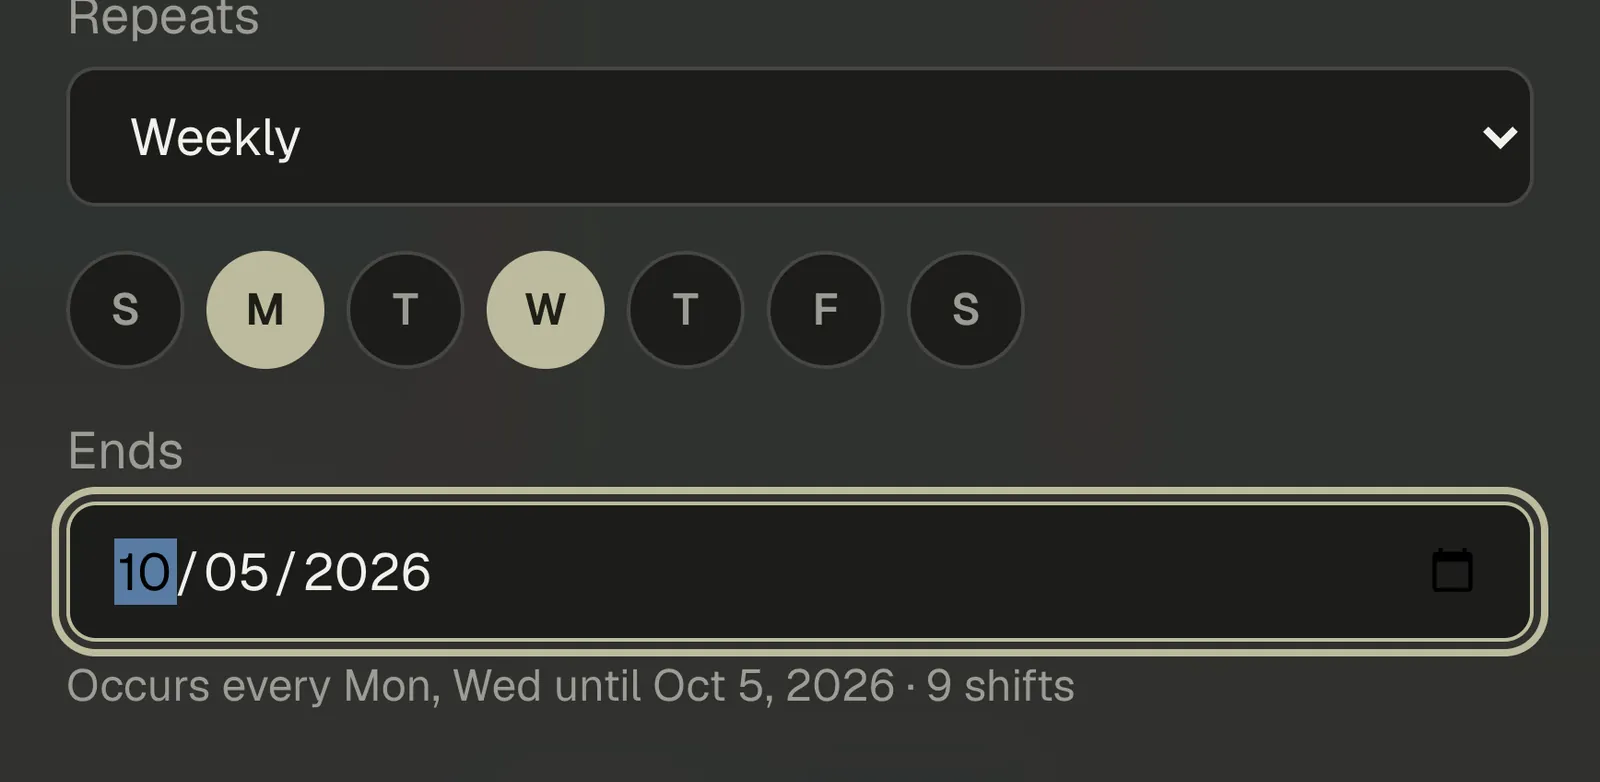
Repeats starts off. Open it and choose Daily, Weekly, Every 2 weeks or Monthly.
Weekly and Every 2 weeks add a row of weekday circles so you can say which days — Monday and Wednesday, say. Underneath, Ends is the last day a repeat is allowed to land on, and a sentence below it counts exactly how many shifts you're about to create before you create them. A repeat tops out at 120 shifts.
Step 6 — The warnings you get while you build
CRMb tells you when a shift looks wrong. None of it stops you — it's advice, and you can schedule anyway.
- A person who has approved time off or is marked unavailable that day shows · off beside their name in the picker, and a red line appears under the field: Has approved time off on this day — you can still schedule. for a member, or Marked unavailable on this day — you can still schedule. for someone on the roster.
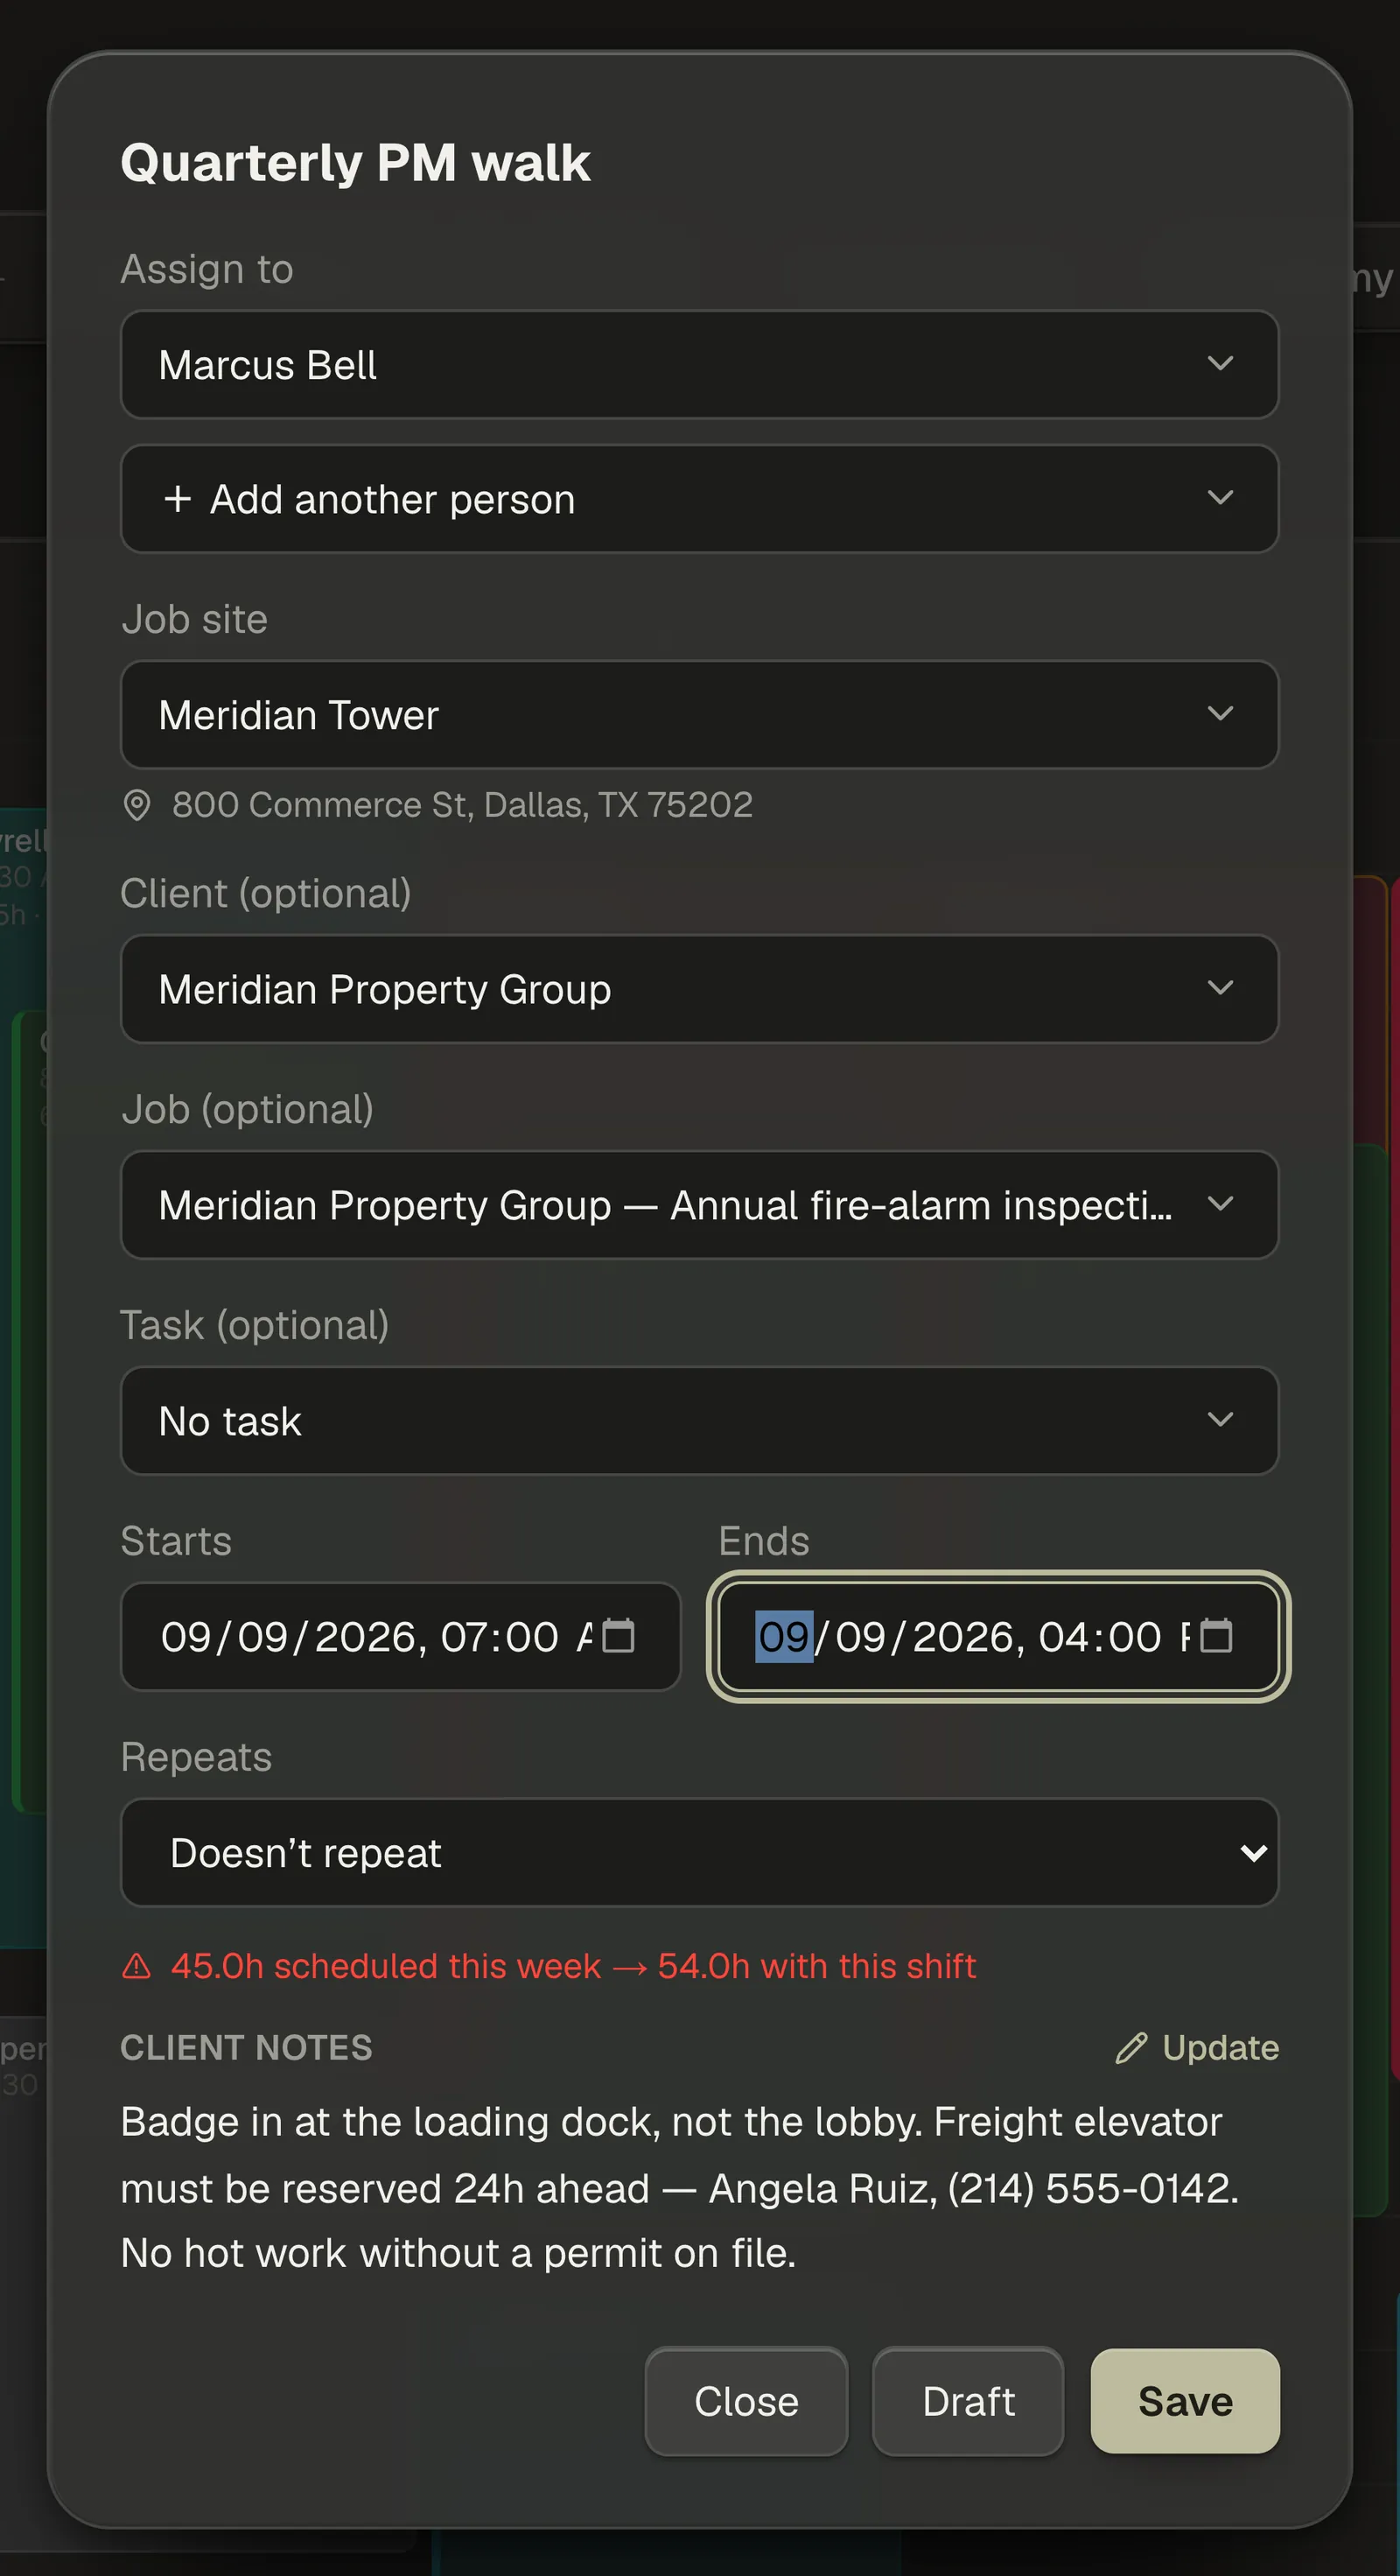
- A line under the fields reads how many hours that person already has scheduled that week and what this shift would make it. It turns amber past forty hours and red past forty-eight. The week it counts is your organization's pay week, not a fixed Sunday, so it matches the week your payroll runs on.

Step 7 — Draft, save, and publish
At the bottom of the composer, Draft saves a shift only you and your managers can see, and Save publishes it. Close leaves without saving.
When drafts exist anywhere in the period you're looking at, Publish N drafts appears in the toolbar — with the real count in place of the N — and flips all of them to published in one go. Publishing is what tells the crew: everyone assigned who has a login gets a notification with the date and time. Roster people have no login, so there's nothing to send them; open shifts have nobody to notify yet.
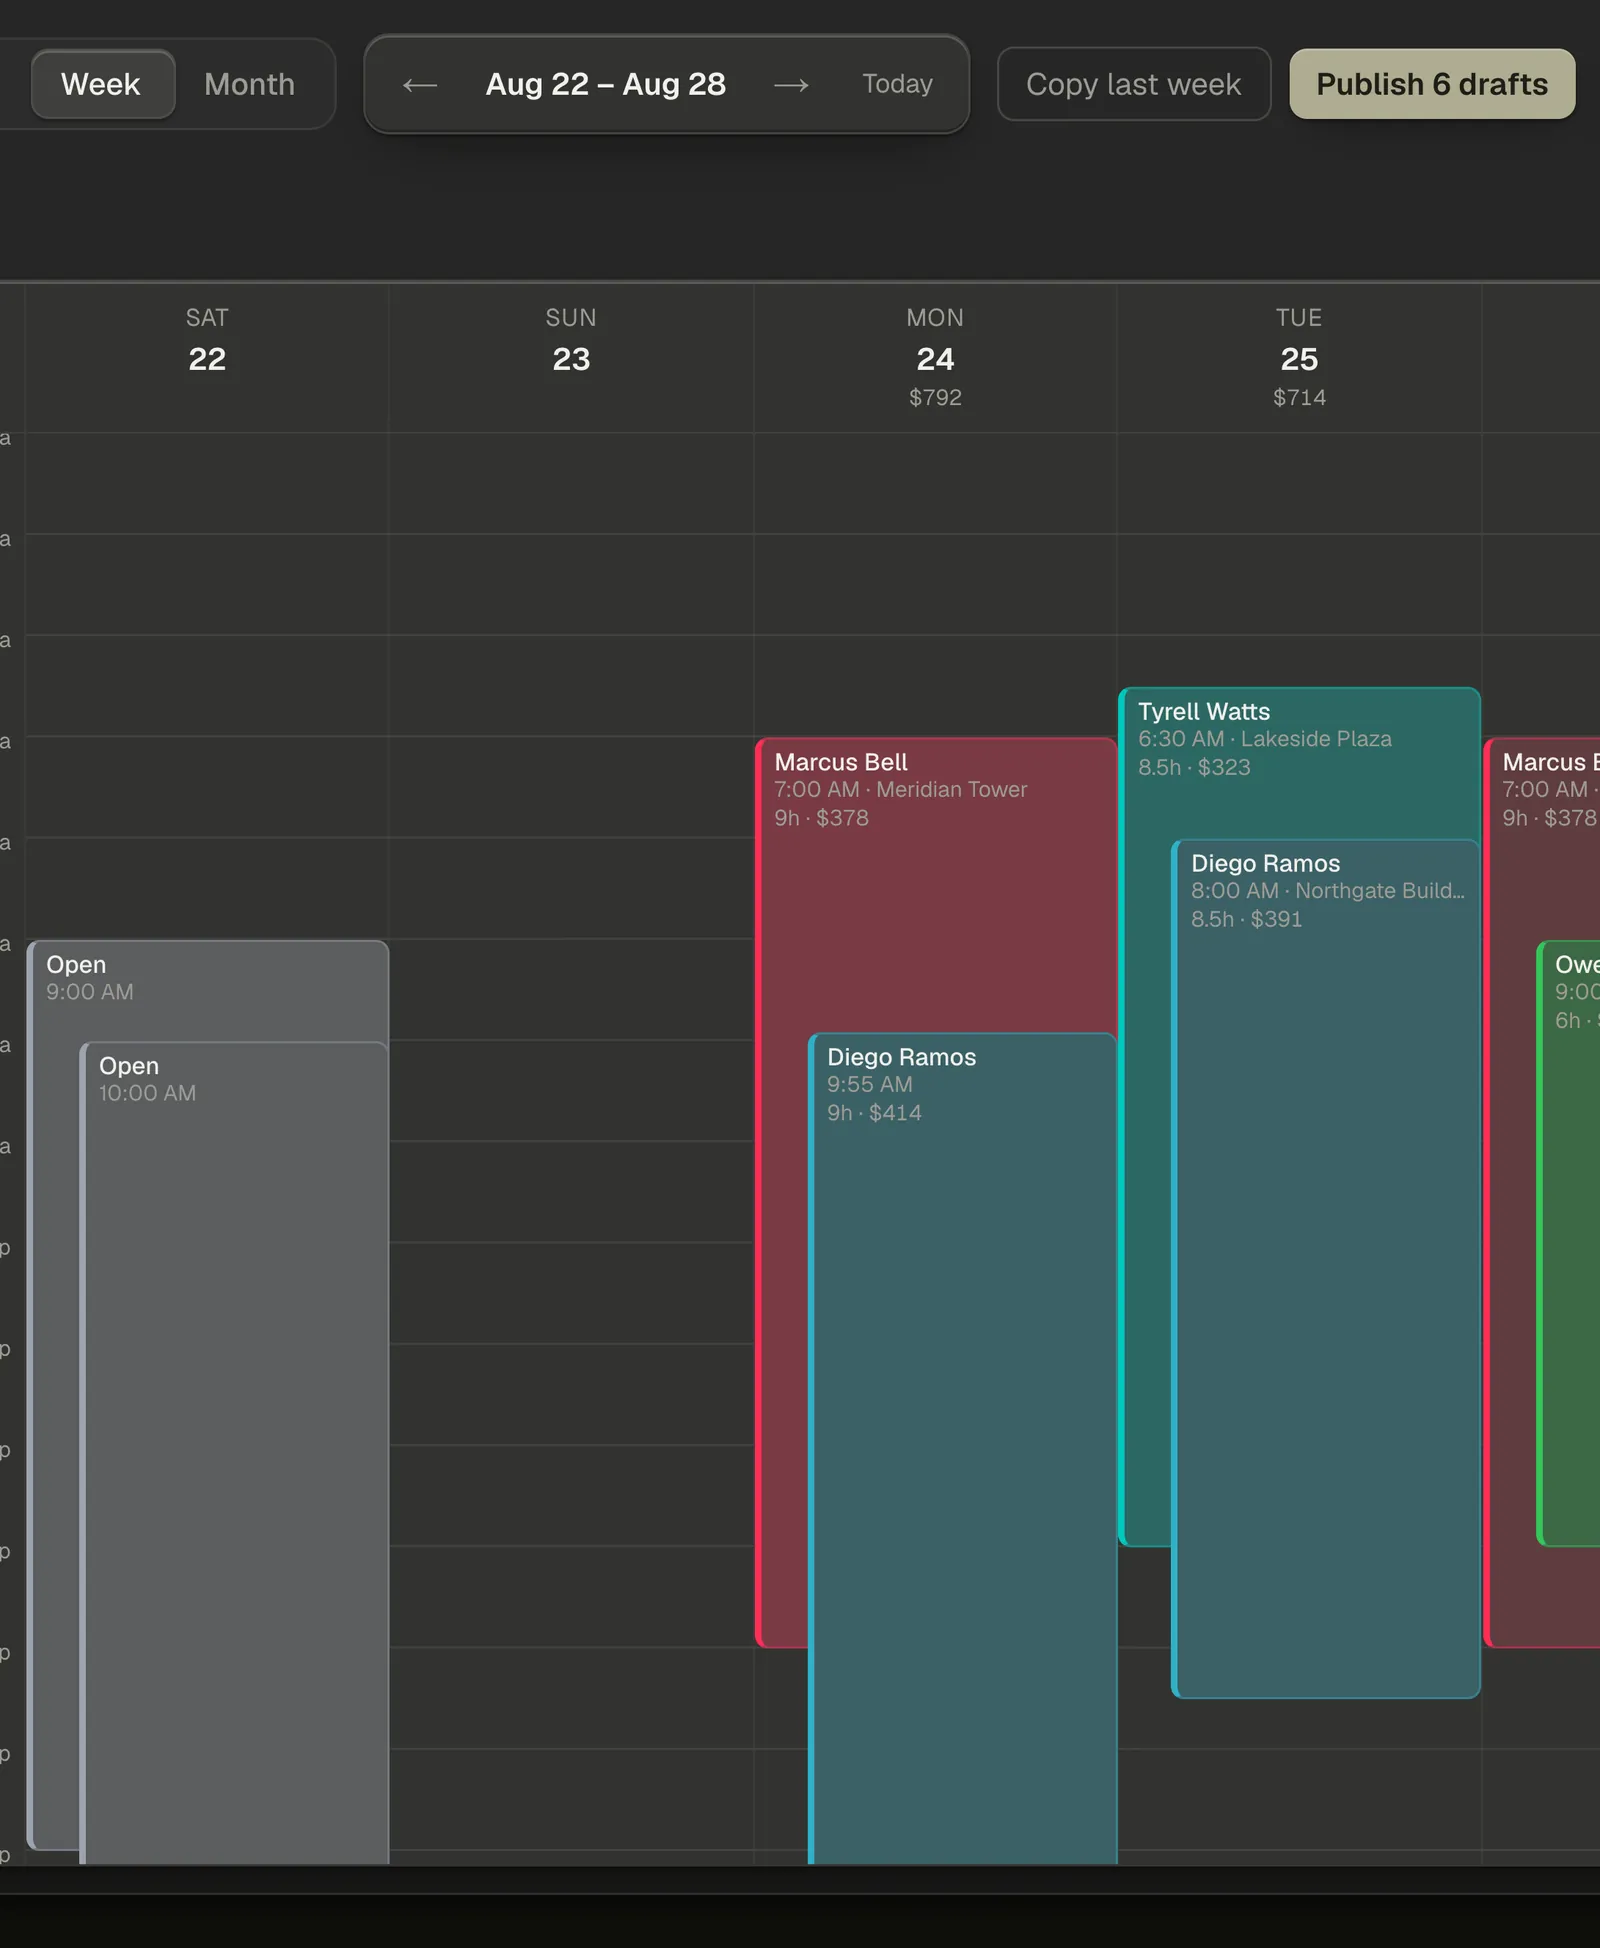
Drafts and published shifts look nearly the same on the calendar — a draft is the same colour, just a lighter fill. The count on the Publish N drafts button is the reliable way to know how many are still unpublished.
Note — On the web, publishing happens the moment you click. There is no confirmation step and no "are you sure", so read the week before you press the button — the notifications go out immediately and can't be recalled. There is no bulk way to unpublish either; taking a shift back means opening it and changing it one at a time.
Step 8 — Copy last week
In Week view, Copy last week clones the previous week's shifts forward as drafts, ready for you to adjust before anyone sees them. It tells you what it did — "Copied 14 shifts", or Last week had no shifts when there was nothing to bring across.
Cancelled shifts don't come along. Clicking it twice won't double the week either: anything already sitting in the target week for the same person, site and exact times is skipped, so a second click copies nothing.

Step 9 — Move, edit, or cancel a shift
Drag a block to move it. It snaps to the nearest quarter hour, on whatever day you drop it on, and a dashed outline shows where it will land before you let go. There is no way to drag a shift's bottom edge to make it longer — length changes in the composer.
Click a block to reopen it. Along the bottom you get:
- Cancel shift — keeps the shift on the calendar, greyed out, and takes it out of your hours and cost totals. Use it when the work is off but you want the record.
- Reinstate as draft — the button a cancelled shift shows instead. It brings the shift back as a Draft, never straight back to published, which the button says out loud: Reinstated as a draft — publish when ready. Publish it again or the crew won't see it.
- Delete — removes the shift entirely. There's no undo.
Step 10 — Open shifts the crew claims
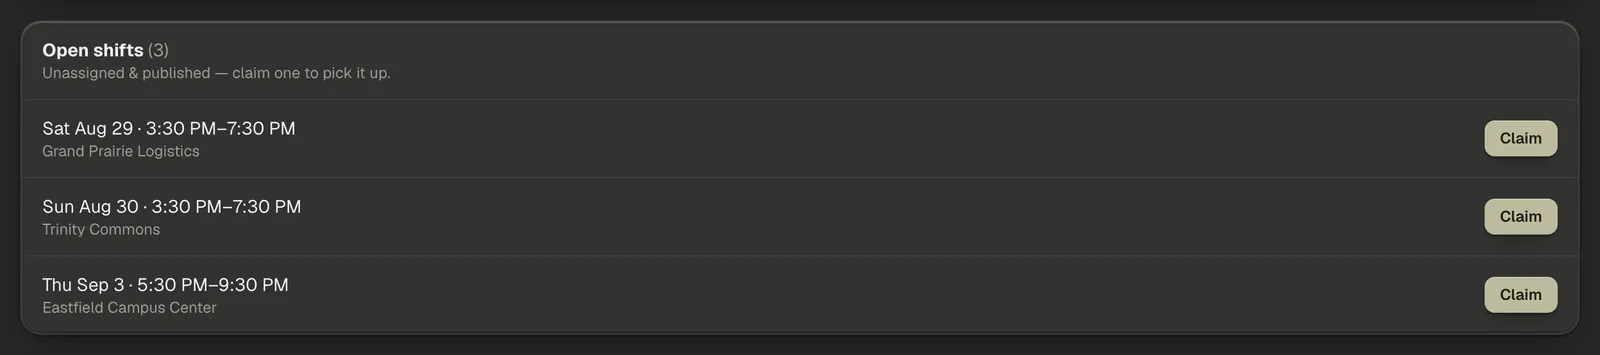
Leave a shift on Open shift (unassigned) and publish it, and it lands in the Open shifts panel under the calendar, where anyone on the team can take it with Claim — from the web or from their phone. On the calendar itself an unassigned shift is labelled Open, and crew members can claim one by double-clicking it there instead.
Once someone claims it, the shift is theirs and the panel drops it.
Step 11 — Notes the crew will actually read
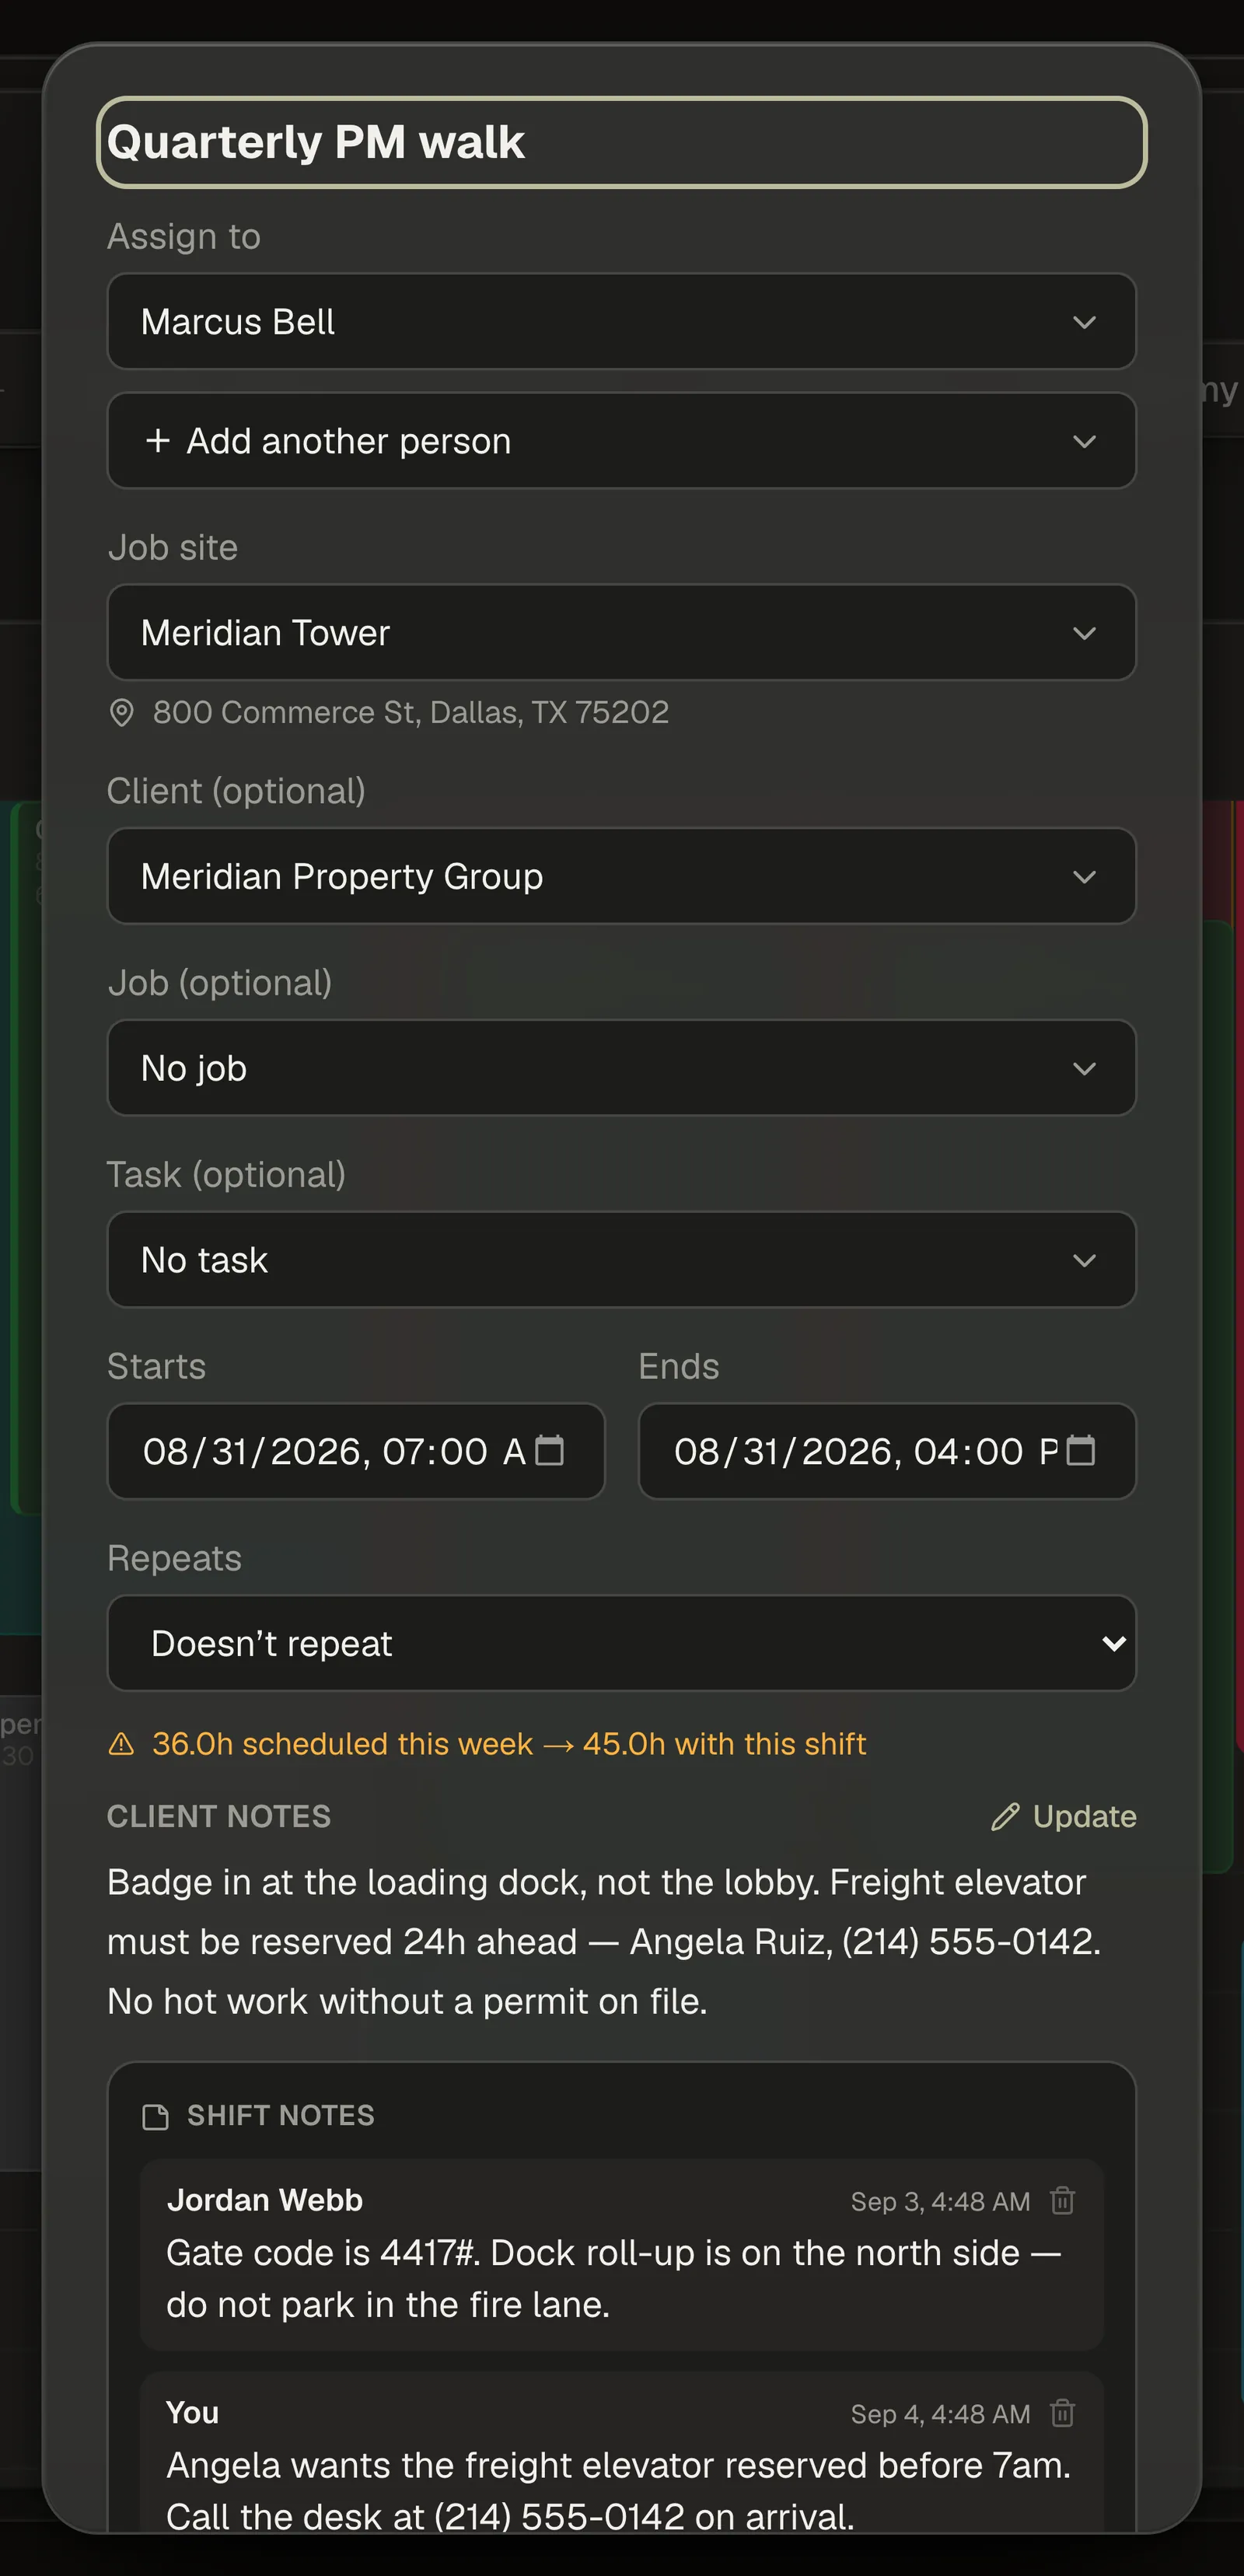
Two kinds of note reach the person working the shift, and both live in the composer once the shift has been saved.
- Shift Notes — remarks about this one shift. Gate codes, where to park, what to bring. Type into Add a note for this shift… and add it. If you press Save with a note still in the box, it's added before the shift saves. Everyone on your team reads the same notes and can add their own — your crew see them when they open the shift, under Notes are visible to your whole team. Every note carries who wrote it and when. Anyone can delete their own; owners and managers can delete any note.
- Client notes — the client's standing notes, shown here whenever the shift has a client on it and editable from this window. Write it once on the client and it rides along on every shift for them.
Step 12 — Hours and actuals: planned vs worked
Once a shift has started it appears in Hours & actuals below the calendar — What actually happened vs the plan.
The header compares the two: planned hours and planned cost on one side, actual hours and actual cost on the other, and a pill that reads On plan when they match or the difference vs plan when they don't. No-shows are counted beside it.
Each row is one shift. Anyone who punched in through Punch fills in on their own and is marked Punch — those rows have nothing for you to do. For everyone else, type the hours worked and press Save, or press No-show. Anything you entered by hand can be undone with Clear.
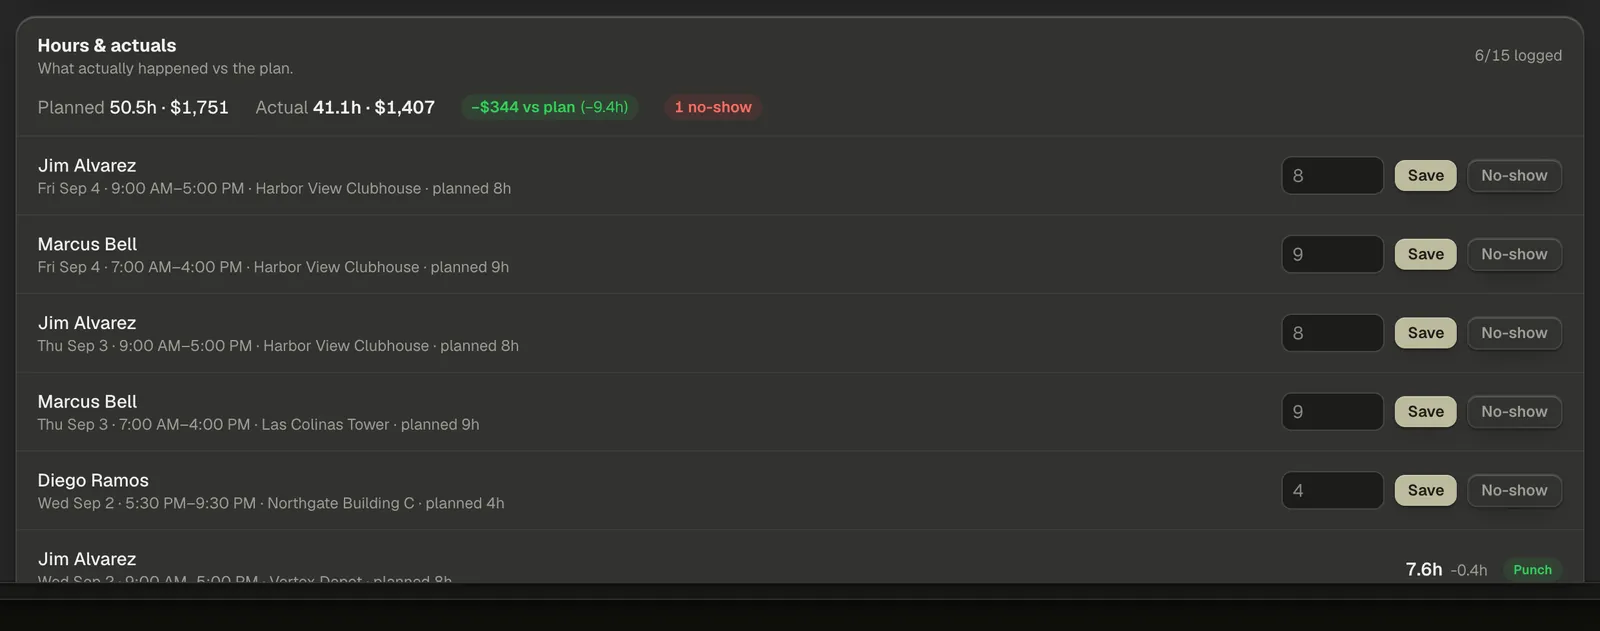
Note — Punch hours always win. If someone punched in against a shift, their real hours replace anything typed in by hand.
Step 13 — Get the schedule off the page
Add my shifts to calendar downloads your own upcoming shifts — the published ones, six months ahead — as a calendar file that opens in Apple Calendar, Google, or Outlook. It's your own shifts only, not the team's, and everyone has the button. If you have none coming up it says No upcoming shifts instead of handing you an empty calendar.
Export gives you the period on screen as a spreadsheet: date, start, end, person, shift, site, status, hours, and Est. cost, with a total at the bottom.
Note — The calendar file is a one-time download. If you want your shifts to keep themselves up to date in Google Calendar as the schedule changes, turn on Google Calendar sync in Settings — that's a separate, per-person setting.