Accounting
Accounting overview
A tour of Accounting — turning your bank activity into clean books, one transaction at a time.
Accounting pulls in your bank activity and helps you turn it into clean books. Money in gets filed as income; money out goes on a job or into overhead. Transactions handles what is new, Completed holds everything you have already filed, and Rules is where your categories live and where routine vendors learn to file themselves.
Accounting is open to owners and managers, and to anyone you have given accounting access — including an outside CPA.
Step 1 — Get your money into Accounting
Until CRMb has something to work with, Accounting shows a single card asking you to connect a bank, with Import your history underneath it for a move from QuickBooks or a spreadsheet. Those are the two doors in. Connecting a bank is for owners and managers; anyone else sees the same card saying an owner or manager can connect it, and can still import. Once either one has landed, the full page appears.
Connected, the page reads as three tabs — Transactions, Completed and Rules — with the controls that feed and frame them across the top right:
- Add — hand-enter a transaction for cash or an account you have not connected.
- Import — bring in history from QuickBooks or a spreadsheet (Step 9).
- Sync now — pull the latest from your bank. It only appears once a live bank connection exists.
- Banks — connect a bank, refresh balances, disconnect one, change how far back a connection reaches, and take transactions off your books (Steps 7 and 8).
- The window: Week, Month, Quarter and Year sit together on the right and you land on Month. The Custom pill beside them opens a From and To picker for any range you like; it takes effect as soon as both dates are filled, and the pill then shows the dates instead of the word Custom.
Sync now and Banks are for owners and managers. Anyone else with accounting access sees the page without them — everything they do is reading, filing and importing, which needs neither.
Step 2 — Read the Transactions list
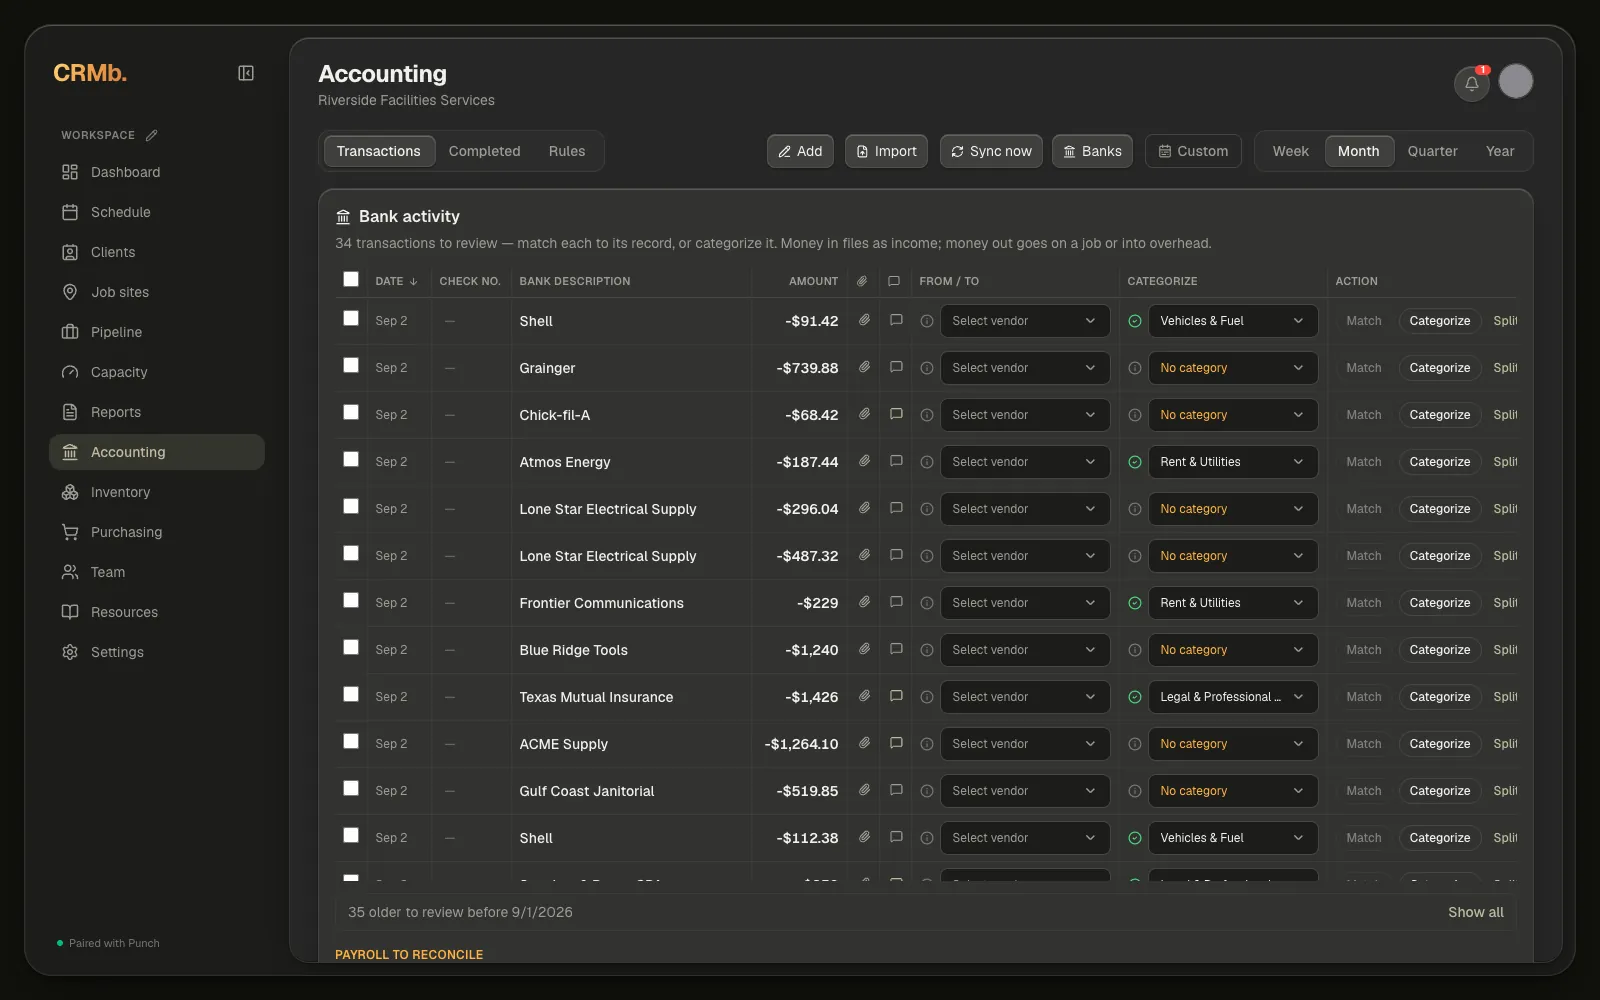
Bank activity lists every transaction in the window that still needs review. Each row is one line of the table: the Date, a Check no. you can type straight into, the Bank description, the Amount, a paperclip for receipts, a bubble for a memo, From / To — the customer on money in, the vendor on money out — Categorize, and Action. Drag a column edge to make it wider, or click Date to flip the sort.
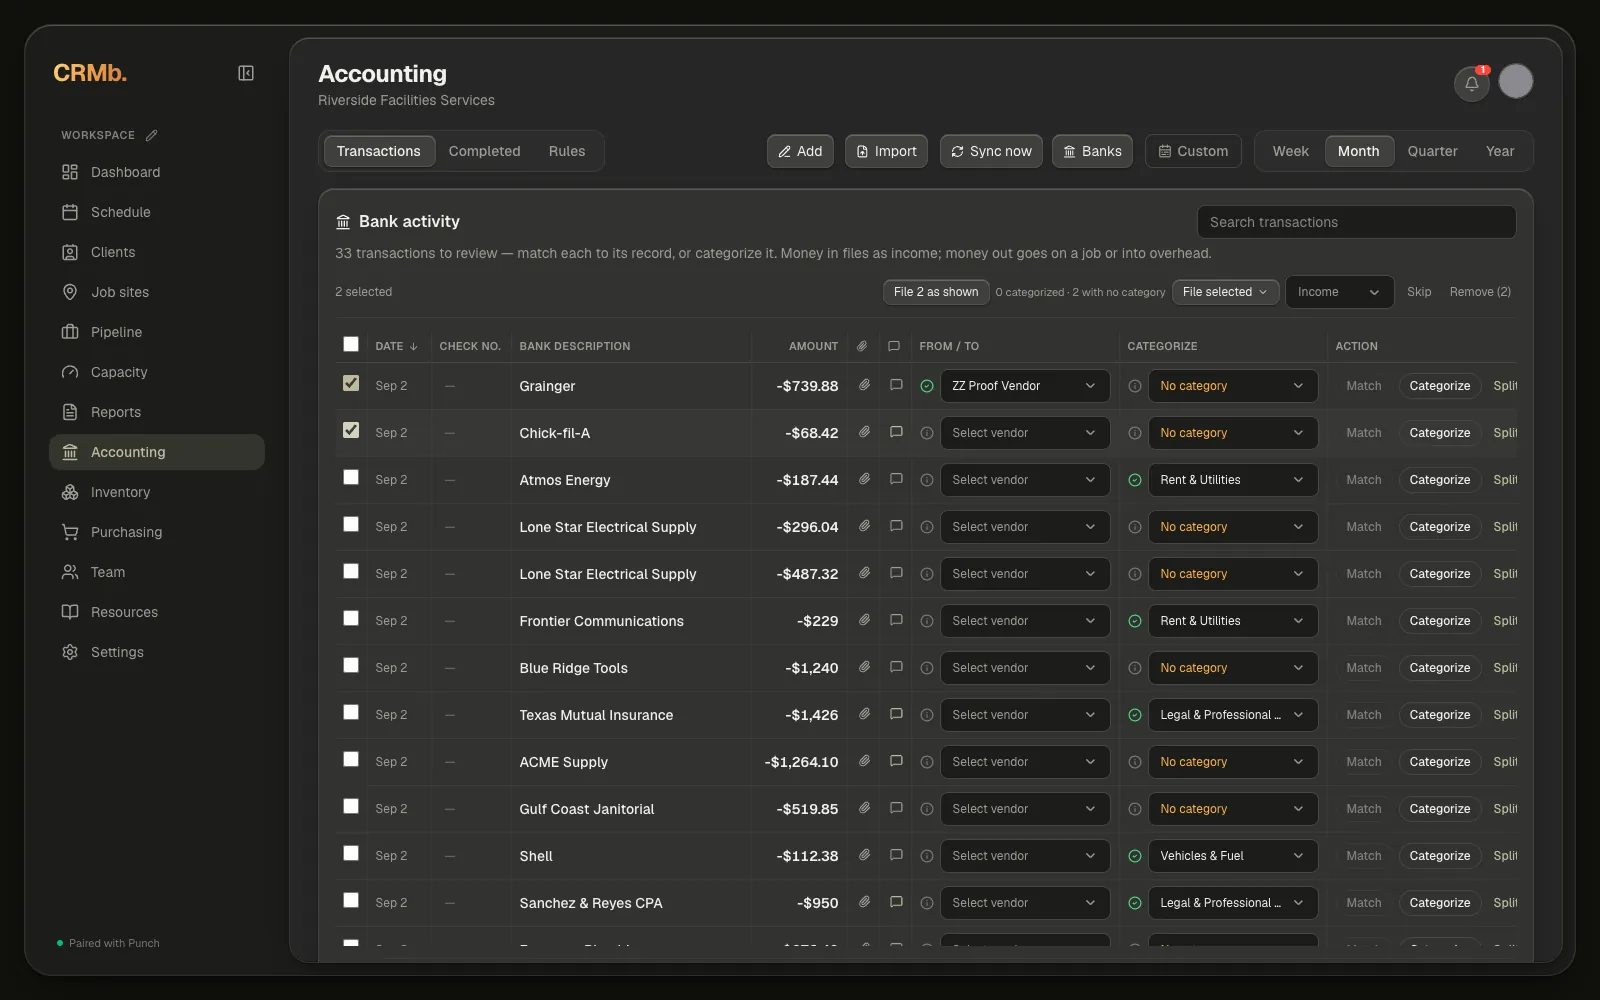
Search transactions sits in the card header, above the table. Typing narrows the list as you go, and it matches the bank's description, the check number, the memo, the customer or vendor in From / To, and the amount — 195 and 195.00 both find the same row. It works inside the window you have selected rather than replacing it, so the line above the table swaps to a count of how many of the window's rows matched, and clearing the box brings the whole window back. When nothing matches, the table stands down and says so, with Clear search beside it. Rows older than the window are not loaded yet, so search reaches them only after Show all.
Two buttons sit in Action on every unfiled row: Match, which settles the transaction against a record CRMb already has, such as an open invoice; and Categorize, which files it where the Categorize cell says. The pencil beside them is Step 5.
Nothing is ever quietly left out. If the window holds more transactions than the page will fetch, a warning above the table says so and tells you to narrow the range. Unfiled rows older than the window start are counted in a row that reads "N older to review", with Show all beside it. And the table itself renders in pages: "Showing N of N transactions", with a button to draw the next batch.
Under the table, Payroll to reconcile flags payroll that was marked paid in Punch with no matching payout in the bank yet. Wait for it to post and match it — or, if you paid that person outside the bank, open the row's Record payout… dropdown and pick how: Cash, Check, Venmo, Zelle, PayPal, Direct Deposit (ACH) or Other. The period is reconciled the moment you pick.
Step 3 — Categorize a transaction
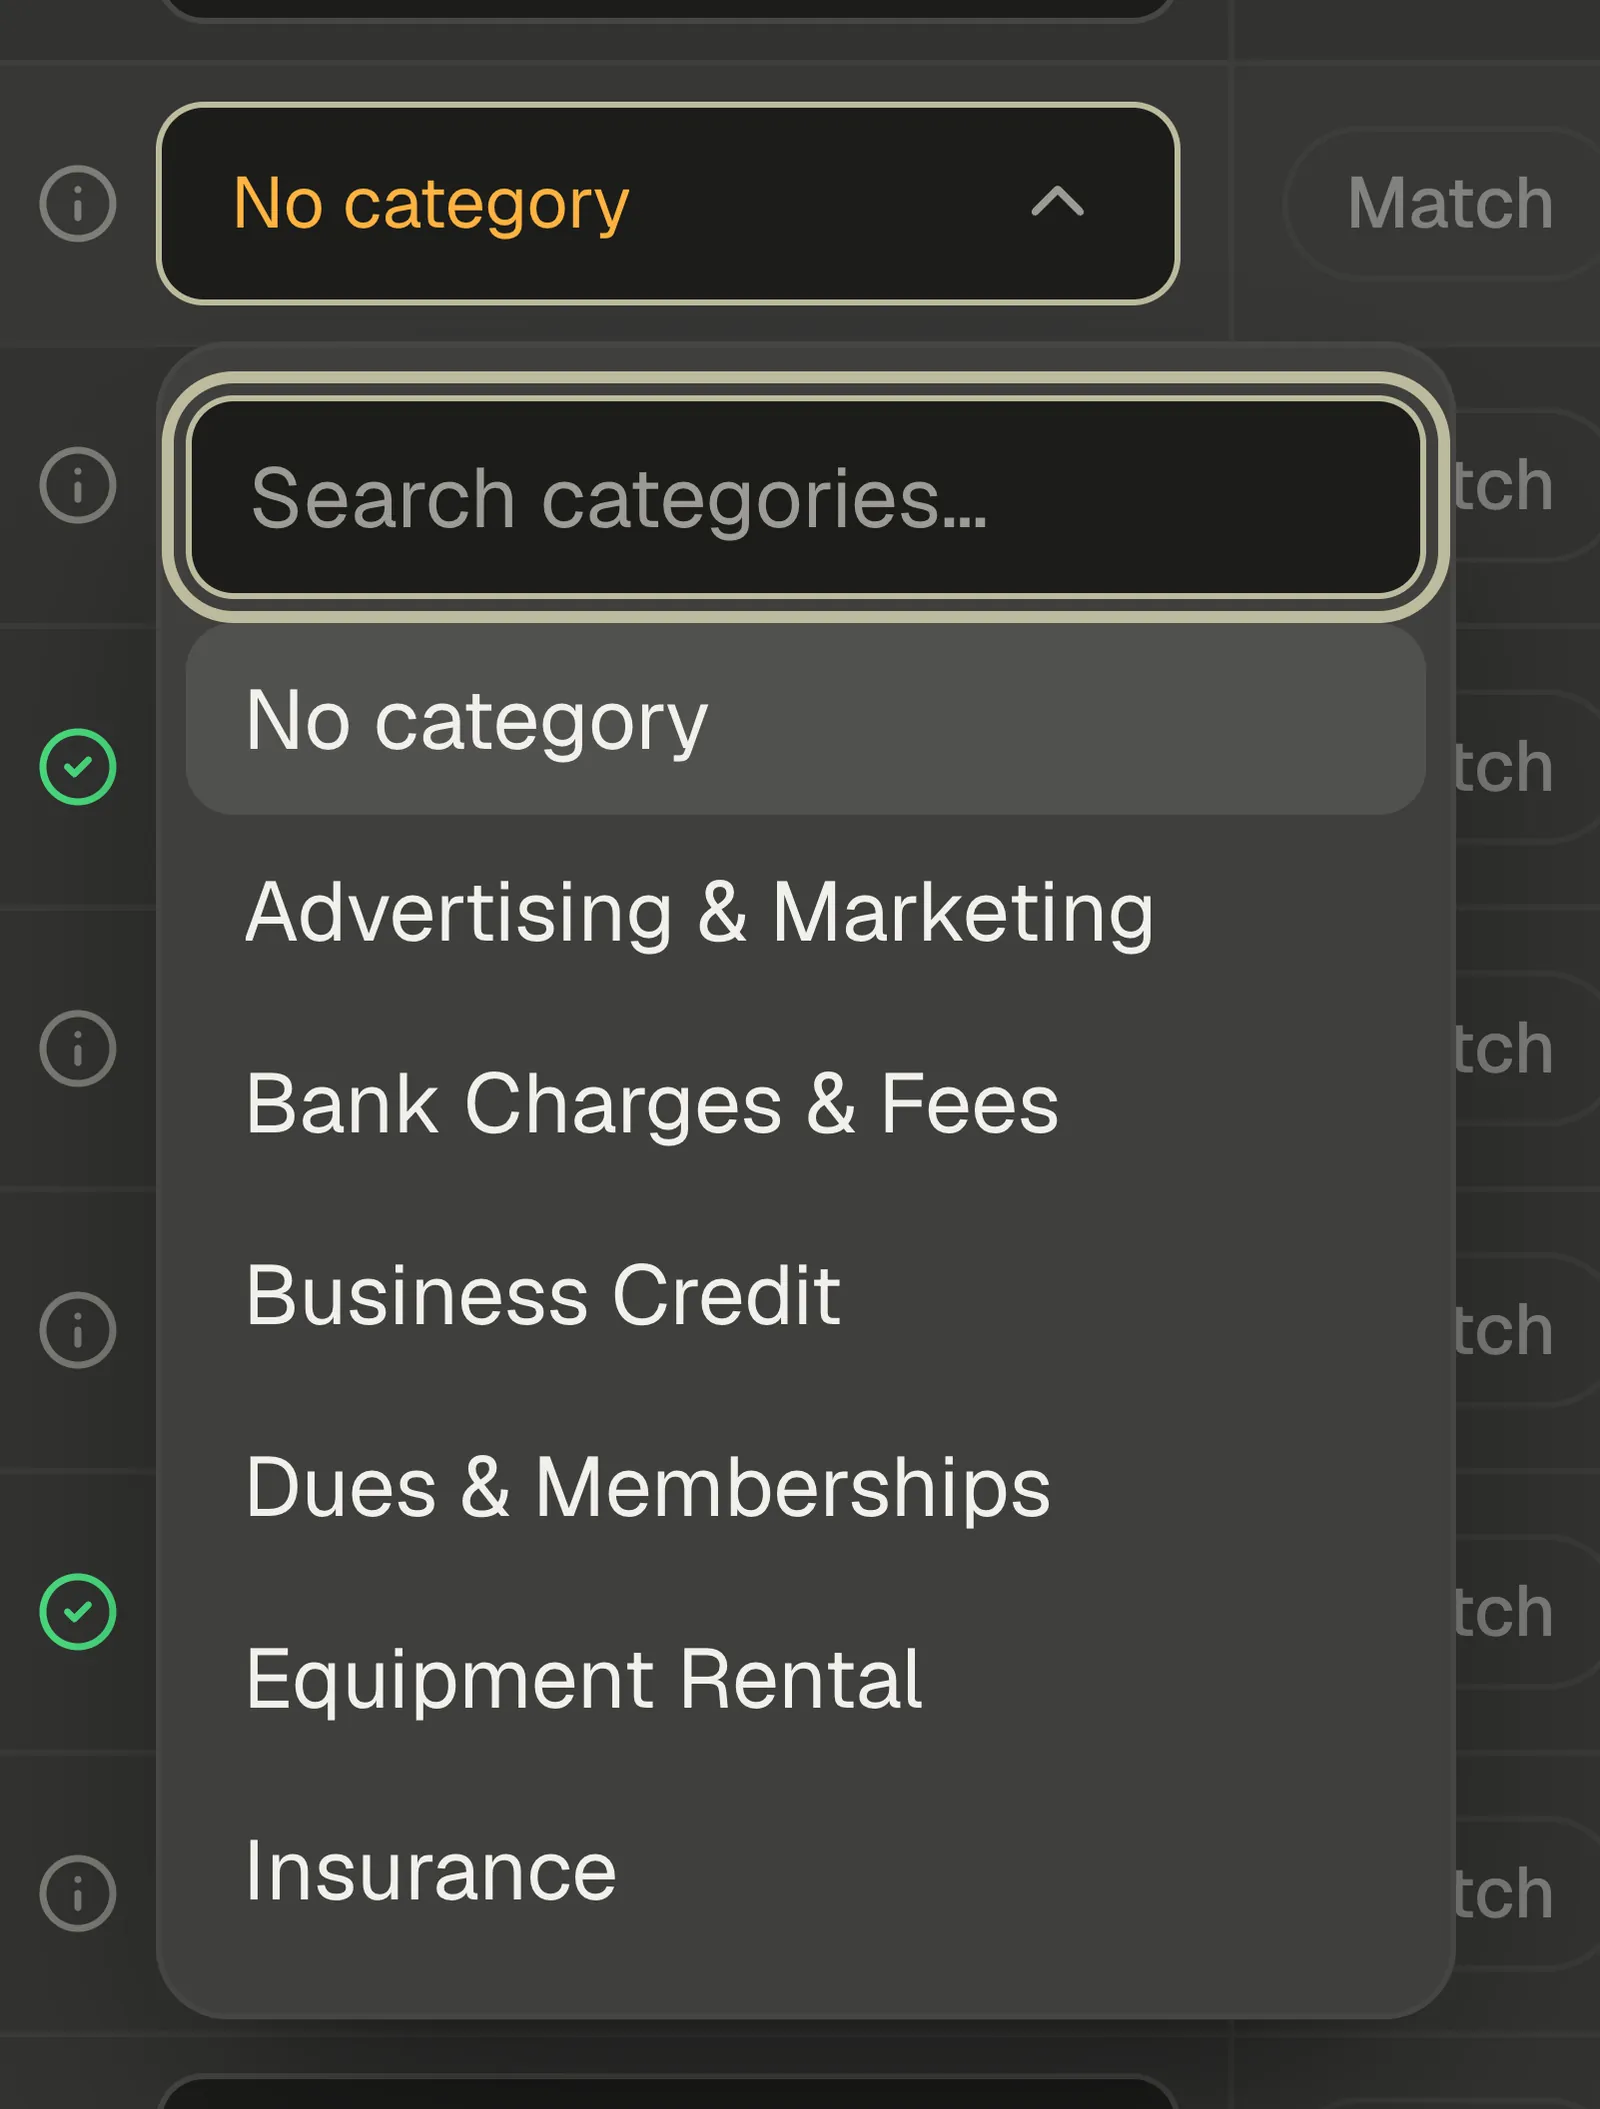
Open a row's Categorize cell and pick where it belongs. The list is your own categories in one flat alphabetical run, with No category pinned at the top. An unset cell reads "No category" in amber, so filing something with nothing on it is visible before you press anything.
Some money-out rows arrive with a category already in the cell and a green check beside it — that is CRMb matching what your bank calls the transaction against a category of yours with the same name. Nothing is filed until you press Categorize. The suggestion is there for you to confirm or change.
Once you press it, the row turns green and shows the filed category under the description.
Note — After you file one by hand, CRMb quietly asks whether it should always file that vendor the same way. Add rule makes it a rule; Not now dismisses it. When the suggestion came from your bank's own category rather than the vendor's name, the offer reads Always suggest instead — a mapping fills the box for you to check, it never files on its own.
Step 4 — File several at once
Tick the checkboxes on several rows and a bar appears above the table.
The first button files each checked expense under exactly what its own Categorize cell reads, and the count beside it tells you first how many of them have a category and how many do not. File selected puts every checked expense on one job or into one overhead category instead. The income dropdown beside it files checked deposits under a single income category. Skip marks the lot as not business activity.
Remove (N) sits beside Skip, and owners and managers see it. It takes the checked rows off your books instead of filing them, which is a different thing from skipping — Step 8. Any hand-entered rows among the checked ones are left alone, and the confirmation says how many.
Step 5 — More ways to file one transaction
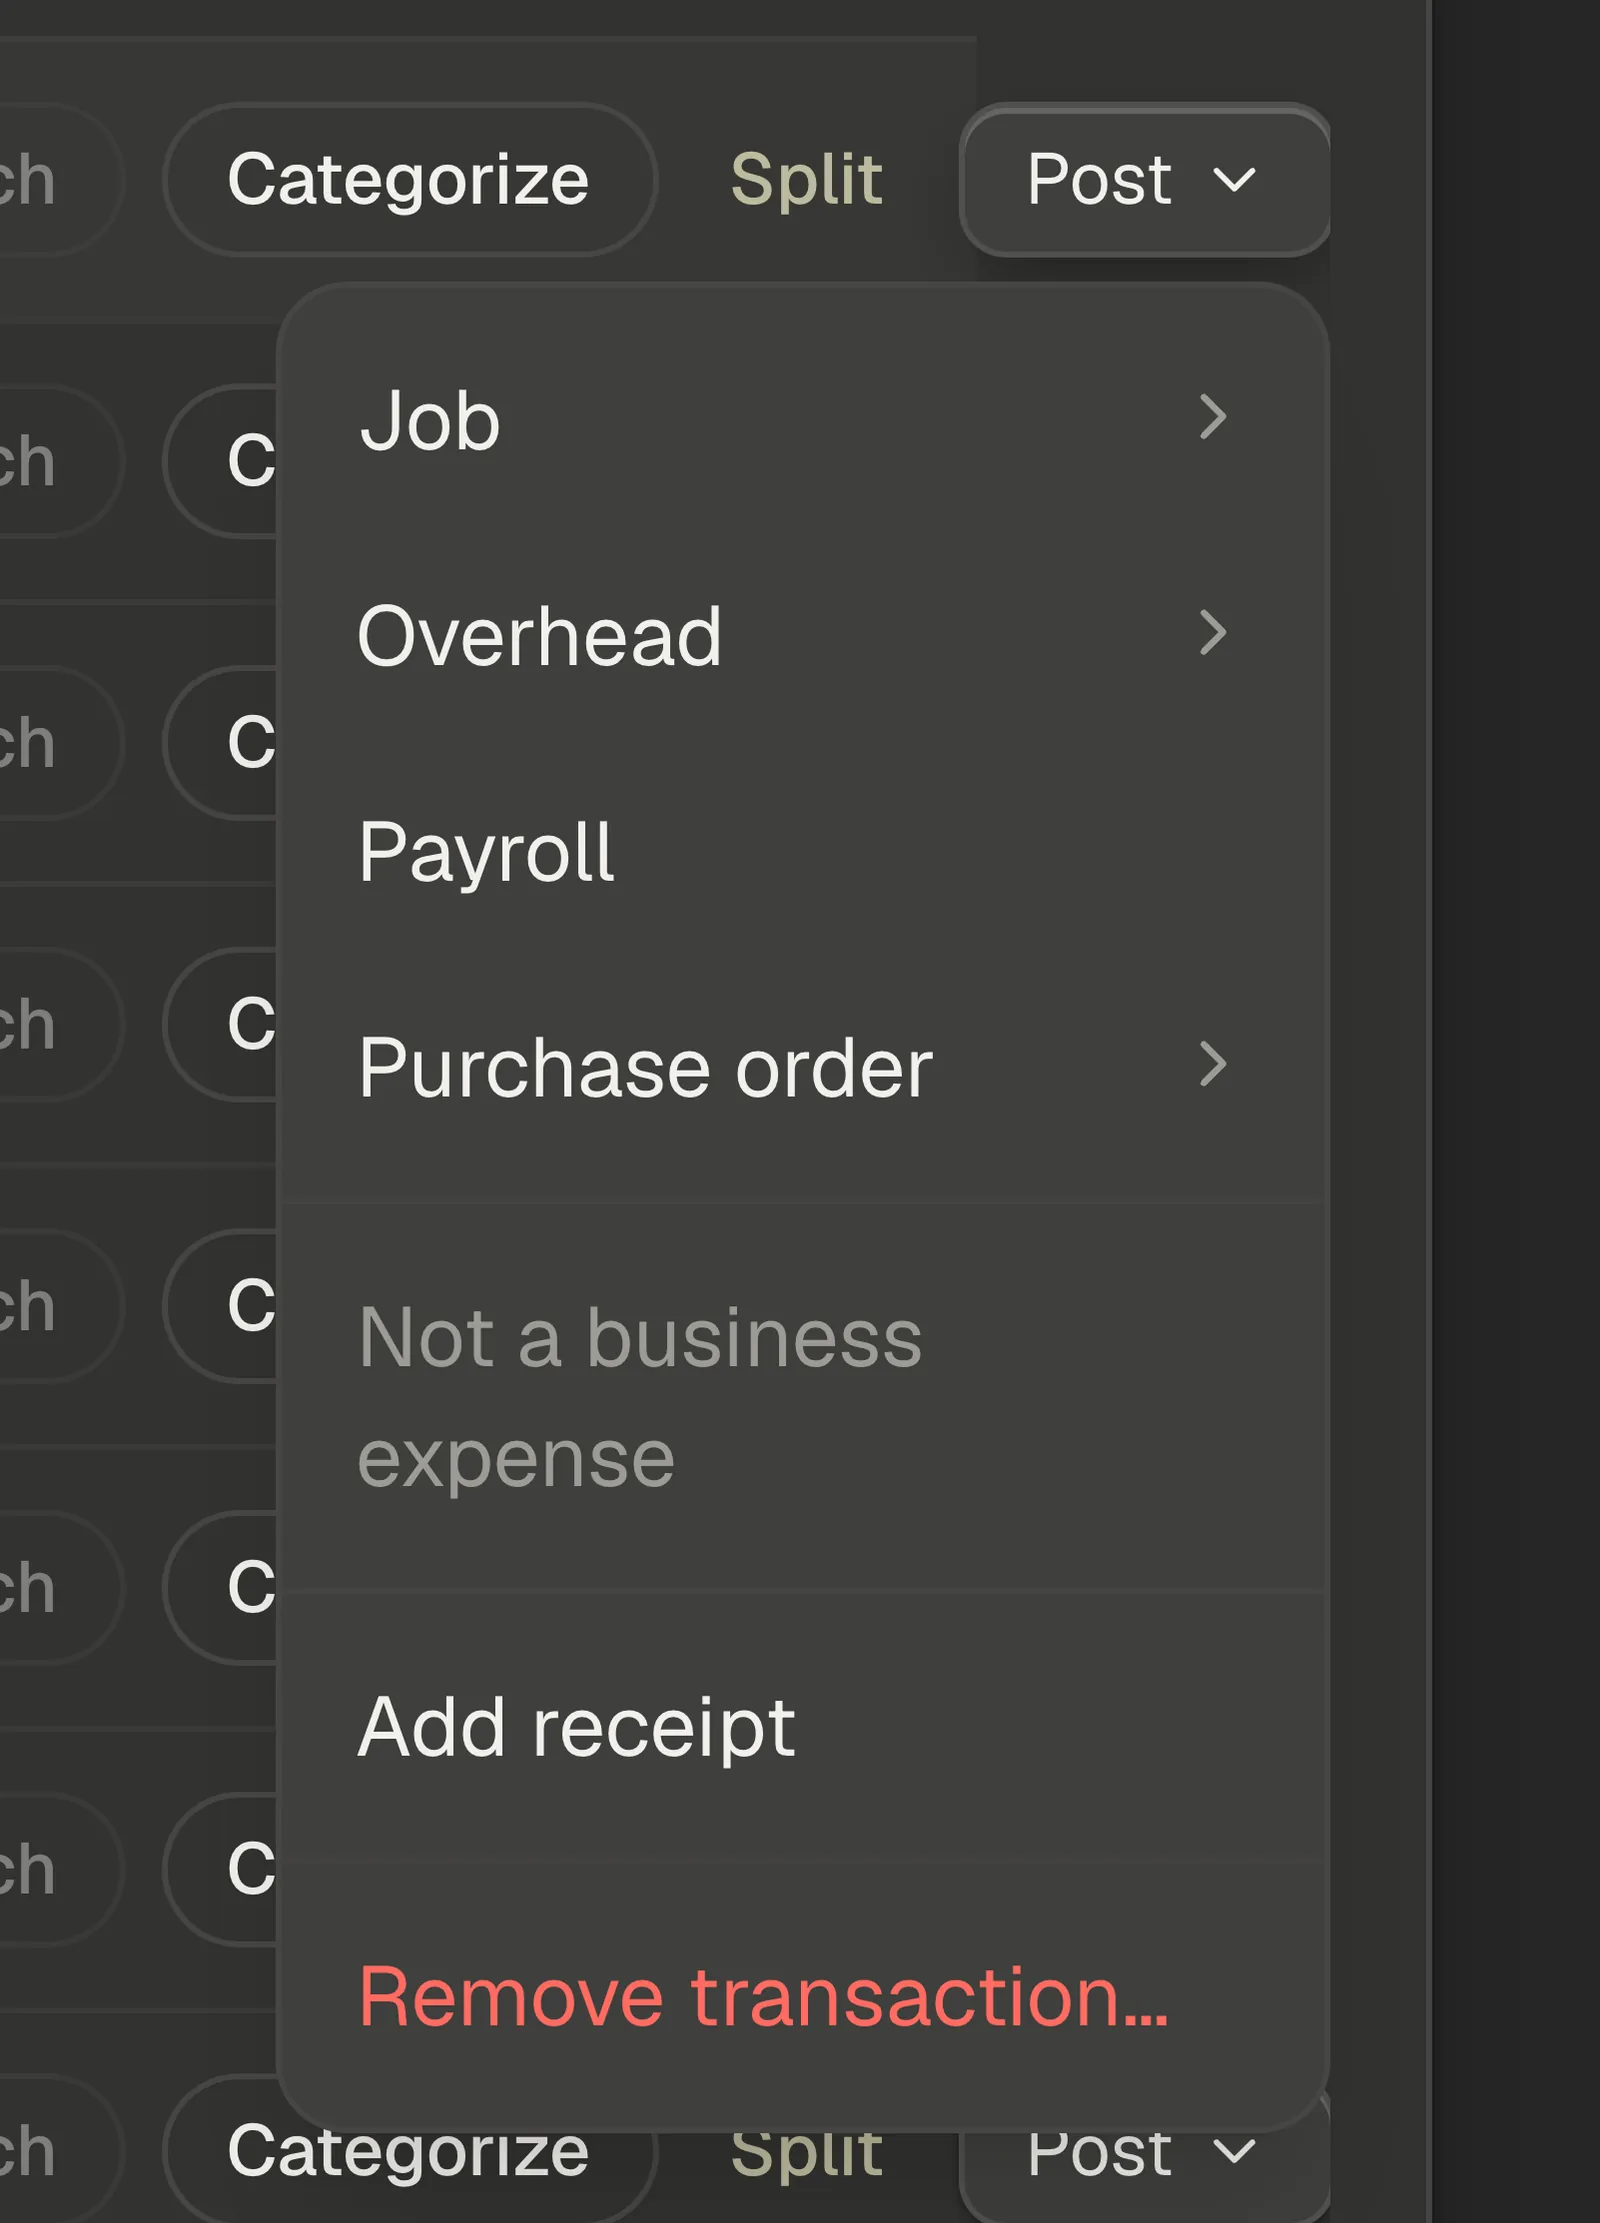
The pencil at the end of a row opens the filing options a plain category cannot cover:
- Job — put the spend on a specific job. With more than one job open you also get Split across jobs…, which divides one charge between several.
- Overhead — file it under a category, or + New category to make one on the spot.
- Payroll — a payroll payout. Where CRMb can see pay periods it might settle, they are listed to pick from.
- Purchase order — settle it against an open PO. This one only appears when you have open purchase orders it could pay.
- Not a business expense — leave it out of your books entirely.
- Move back to review — undo a filing and put the transaction back in the list.
- Add receipt — attach a photo or a PDF. Once something is attached the paperclip in the row opens it, and the menu gains a View receipts entry.
- Remove transaction… — take the row off your books entirely. It sits on its own at the foot of the menu, and only owners and managers see it (Step 8).
The check number, the memo and the customer or vendor are edited on the row itself, filed or not: type the check number straight into its cell and tab away, and the memo and the From / To picker open in place on the row.
Type a name the From / To picker does not have yet and it offers to make the record: Create vendor on money out, Create customer on money in, on the last row of the list under anything that partly matched. Either one opens a small form over the page — the tab, the window, your checkboxes and any category you had staged all stay exactly as they were — and the name you typed is already in it. If the name is one you already have, including a vendor you deactivated or a client you archived, CRMb says so and offers to use that record instead of making a second one.
Creating a vendor is for owners and managers whose plan includes Inventory, because vendors and suppliers are one list and that list lives in Purchasing. Creating a customer is open to anyone who can open Accounting. The customer form is deliberately short — a name, an email and a phone number — and it has no address, so it never creates a job site in Punch; add the address in Clients when you want one.
Note — There is no separate details screen on the web; that one belongs to the Mac and iPad apps.
Step 6 — Set up categories and auto-categorize rules
Switch to Rules. Categories on the left is your own chart of accounts, and Auto-categorize rules on the right is where the routine ones stop needing you.
Categories are yours to shape. If you have none yet, Add a starter set gives you ten to begin with — Advertising & Marketing, Vehicles & Fuel, Insurance, Job Supplies, Meals, Office Supplies & Software, Rent & Utilities, Repairs & Maintenance, Subcontractors, and Taxes & Licenses. Type a name in the box to add your own, and use the menu on a chip to merge it into another one.
Each category carries a type — income, expense, equity, asset or liability — set from the small dropdown on the chip itself. Only income and expense reach your profit and loss; equity keeps owner draws and transfers between your own accounts off it. Income categories work the same way as expense ones: you add the ones your business bills under, then set their type to income so they land on the right side.
A rule is a piece of a vendor's name and a category: Vendor contains… plus Category…, then Add rule. New expenses that match go straight to overhead under that category and never reach the review list. There is also a button that runs your rules across every unfiled expense you already have, not only the ones in this window.
Below the rules you may see Category mappings. That is what your bank's own category names mean in your books. A mapping only fills the Categorize box so you can check it — nothing is filed until you press Categorize.
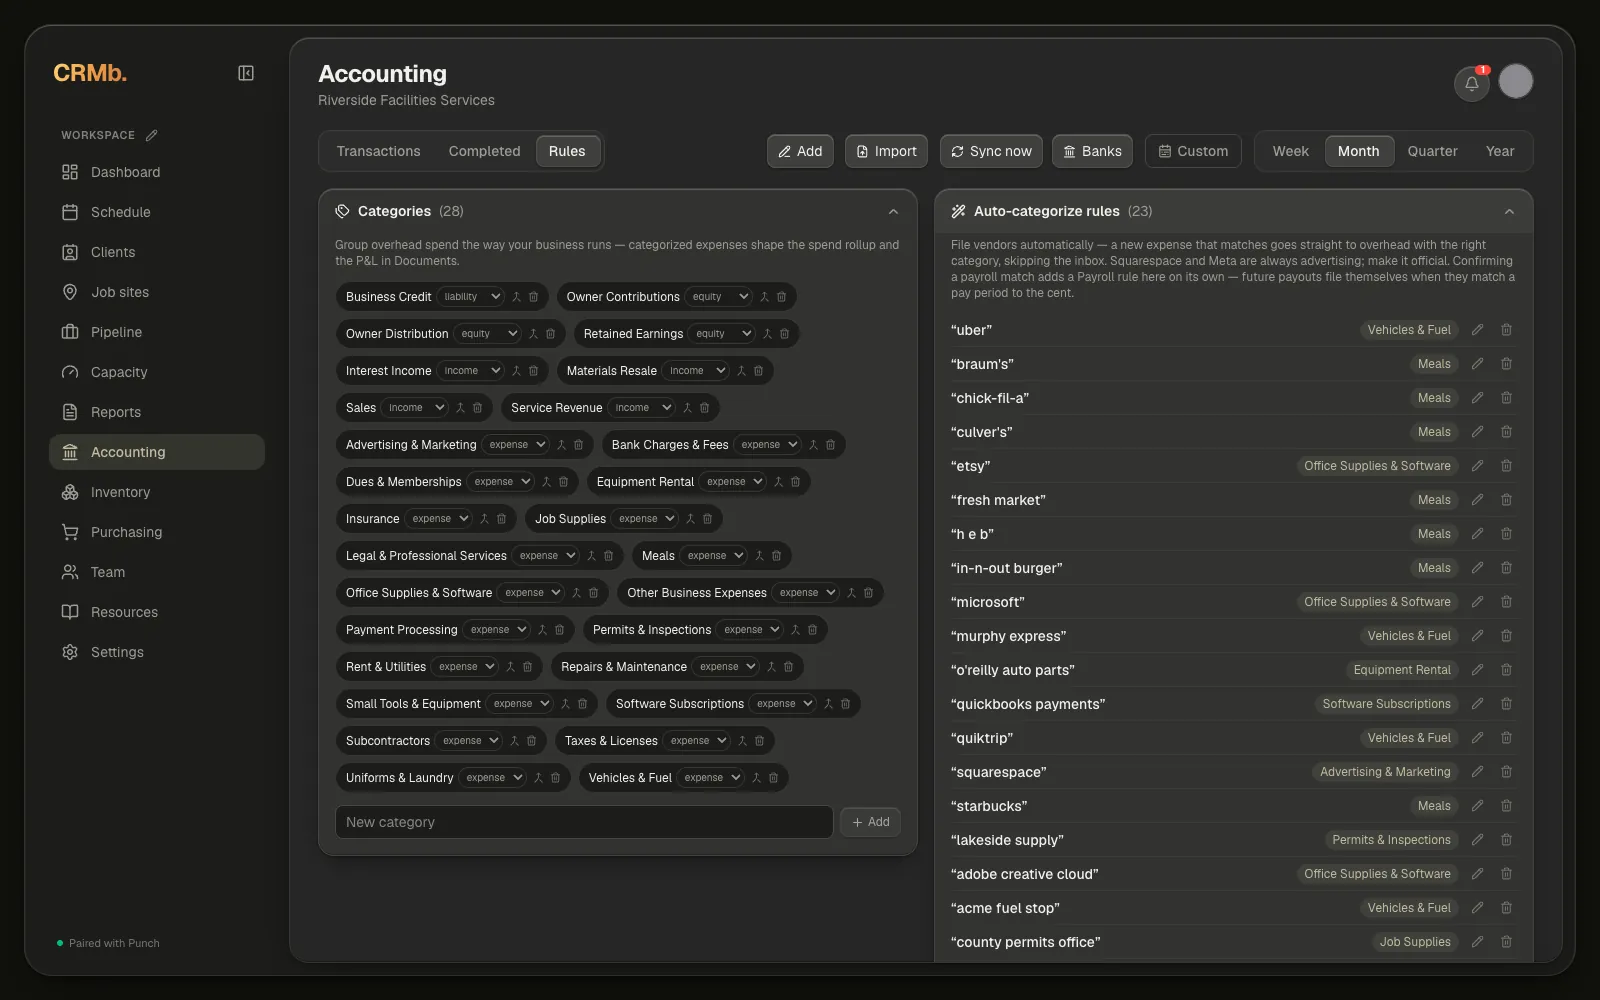
Note — Confirming a payroll match adds a payroll rule here on its own. Future payouts that match a pay period to the cent file themselves from then on.
Step 7 — Connect a bank, and choose how far back it goes
Banks in the toolbar holds the connection itself. Connect a bank… adds one.
After you sign in at your bank, and before a single transaction lands, CRMb asks How far back should we go? Your bank can give up to two years of history, and you pick where to begin: Last 90 days, This year, Last 12 months, Everything your bank has (2 years), or Start from a specific date…. Anything dated before that start is skipped. It opens on This year — unless you have already imported history, in which case it starts the day after your last imported transaction and says so, which is what keeps a move from QuickBooks from landing twice. That suggestion always falls within the last two years, so it is a start your bank can serve.
That start is not a decision you are stuck with. Each connection has its own row in the Banks menu reading History starts: with a date — or "as far back as your bank allows" when no start was ever set — and Change… beside it, and the same row sits on the bank in Settings → Banking. Moving the date later takes the older transactions off your books, under the same protection as everything in Step 8, and tells you how many were removed and how many were kept; where one of those bank transactions had replaced an imported copy, the imported copy comes back in its place, and the receipt says how many did. Moving it earlier brings back what a later start had taken off, then pulls the rest of the range in from your bank right then and reports how many transactions came in — only ones that were not already on your books are counted. On a very large book it may ask you to run Sync now to finish, and if your bank stops answering part-way it says so and offers to try again — it never reports the pull as done when it is not. Choosing Everything your bank has (2 years) here never takes anything off your books: a bank with any start date loses it and everything that start took off comes back, and a bank with no start date is left as it is. A start in the future, or more than two years back, is refused with a sentence saying which.
With a live connection the menu also carries Refresh balances, and a Disconnect entry named after the bank — which stops the syncing and clears that bank's transactions with it.
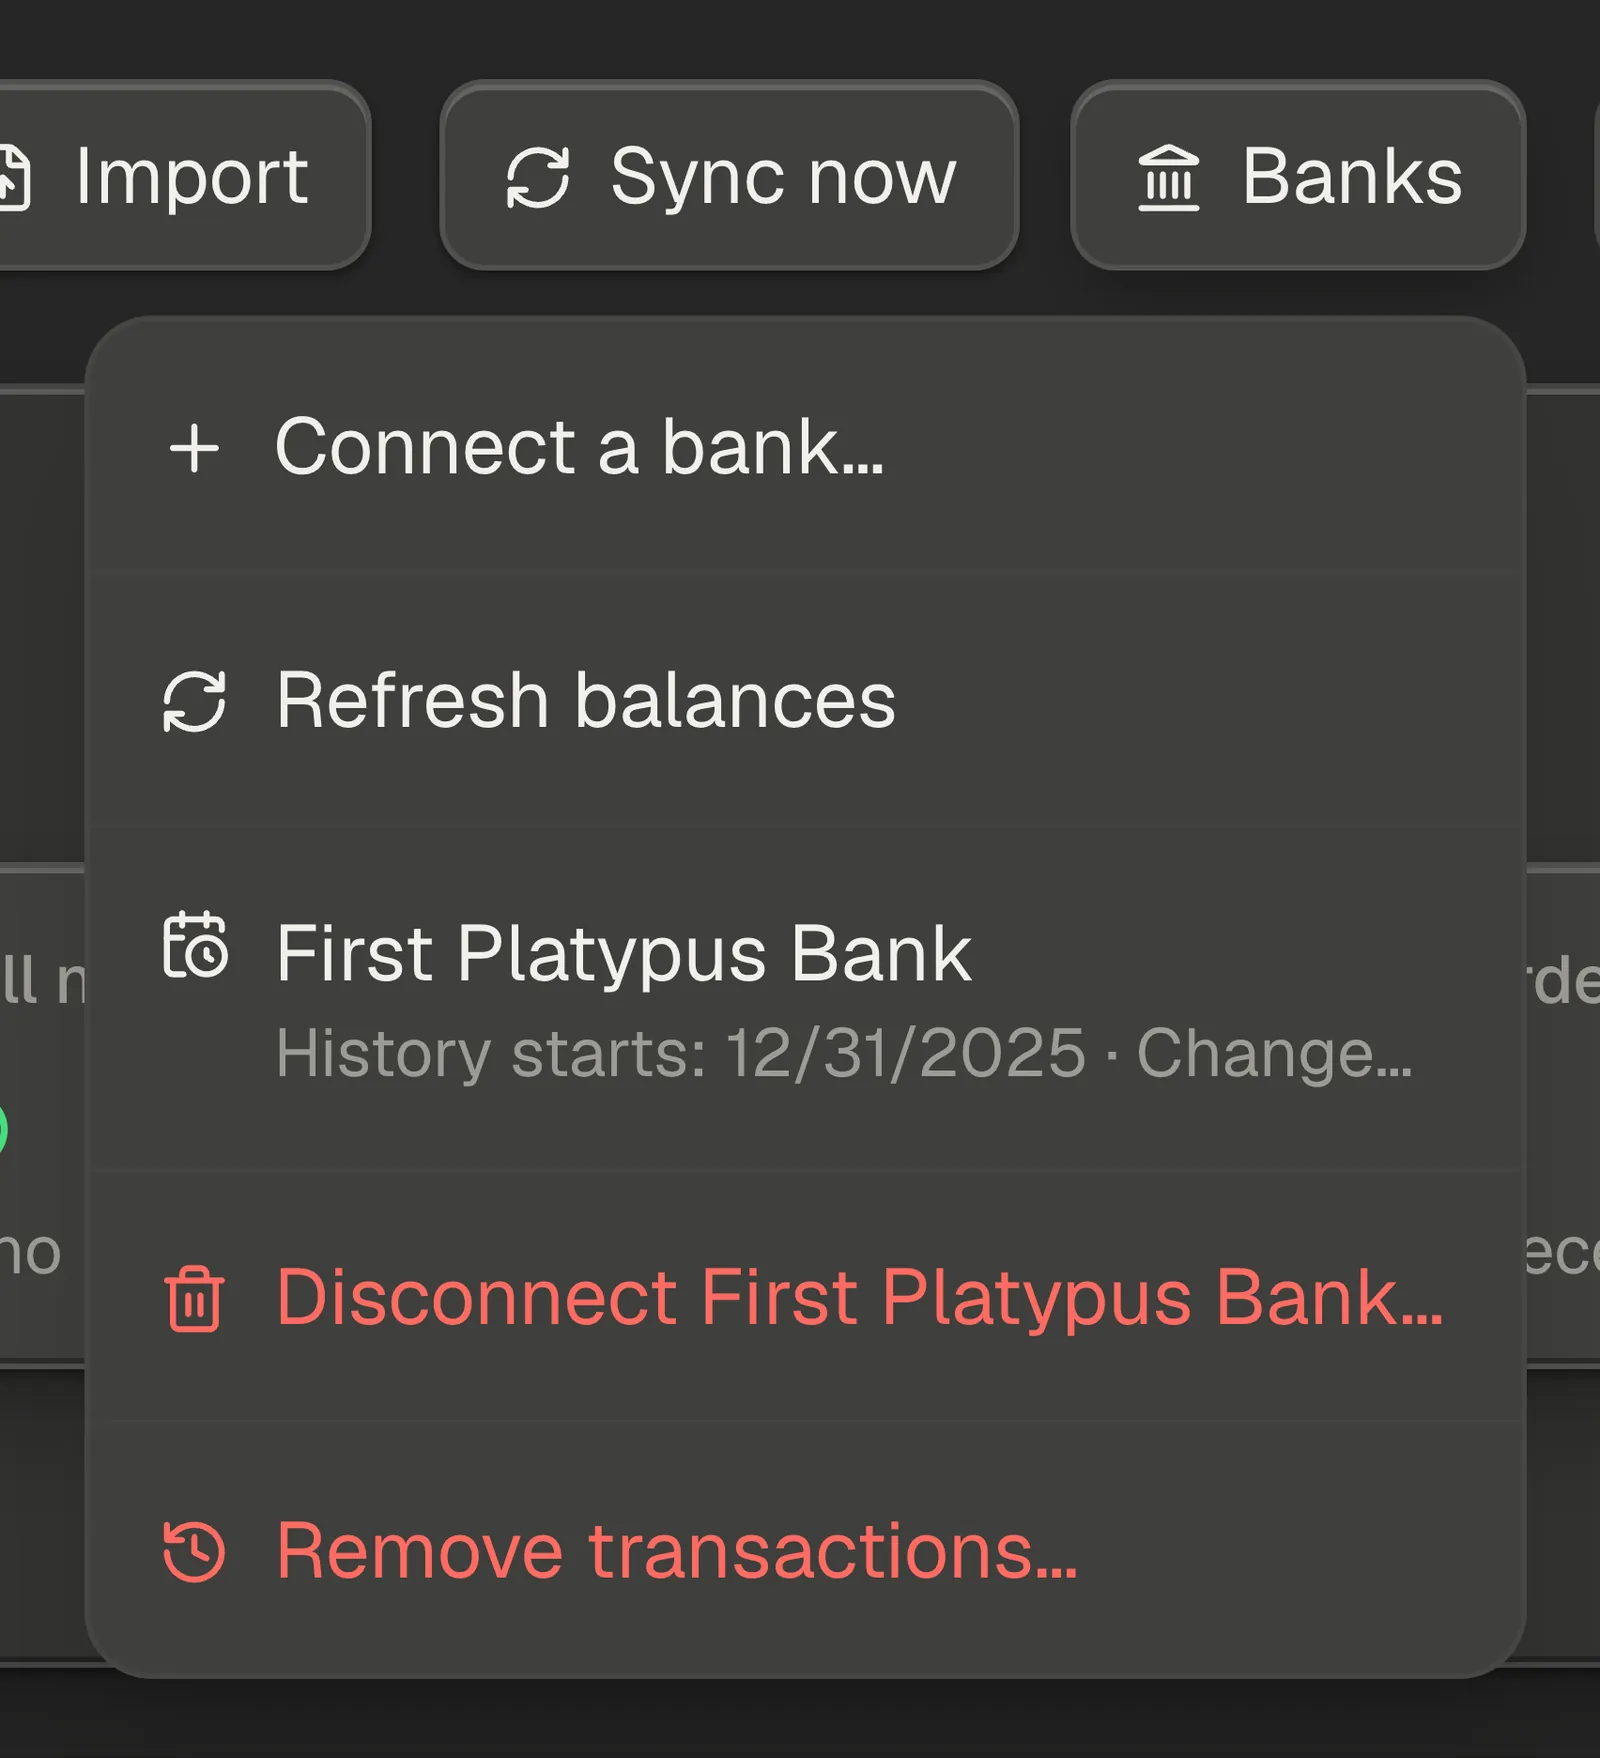
Note — Some banks hand over less than two years, and they decide that once, when the connection is made. Your start date cannot reach further back than what your bank gave, and asking for more means disconnecting and connecting again — which clears that bank's transactions first. Changing where your history starts never requires that.
Step 8 — Take transactions off your books
Removing is not skipping, and the difference matters. Skip says a transaction is not business activity: the row stays in your books, sits in the Skipped section on Completed, and can be brought back. Removing takes it out altogether — it stops counting toward your profit and loss, so a report you have already read can change. Anyone who can open Accounting may skip a row; removing is for owners and managers.
One row at a time, that is Remove transaction… at the foot of the pencil menu. Several at once, it is Remove (N) in the bar above the table. Either way CRMb asks first, and it says what it will not touch: anything filed to a job, payroll or purchasing, recorded as a customer or bill payment, carrying a receipt, or tied to Stripe is kept — and transactions you entered by hand are never removed this way. It also says plainly that bank transactions you remove don't come back, and that imported ones return only through a fresh import. The confirmation carries the real numbers — how many match, and how many of those will be kept — so the count on the button is what will actually leave. If the count cannot be made, the dialog says so, and its Retry counts again.
For anything larger, open Banks and choose Remove transactions…. It asks three things: a Source (All sources, Imported records, Earlier imports, each connected bank by name, or a single file you imported), a Dated from and to, either of which you can leave blank for no limit on that end, and Only rows not yet filed for when you only mean to clear the review pile. Earlier imports is history you imported before CRMb kept each uploaded file separately — on many books, most of what was imported. The count under the controls recalculates as you change them, and the button carries it, so nothing is confirmed blind. When an imported transaction had replaced its bank copy and you remove only the imported side, the bank copy comes back, unfiled, for review — the confirmation counts those beforehand and the receipt afterwards.
A large removal goes in steps and counts as it goes, and each step is kept as soon as it finishes; if anything stops it part-way, the dialog says how many went and a second try picks up where it left off. When it finishes you get the receipt: how many were removed, and how many were kept and why, reason by reason — for example 2 filed to a job and 1 carrying a receipt. Hand-entered rows that were in scope are listed as left alone.
Removed transactions stay off your books, and the confirmation says so. A transaction from your bank that you remove does not come back on any sync while the bank stays connected; if you disconnect the bank and connect it again, the bank sends its history fresh and removed transactions come back with it. An imported one comes back only if you import its file again and choose to include it (Step 9).
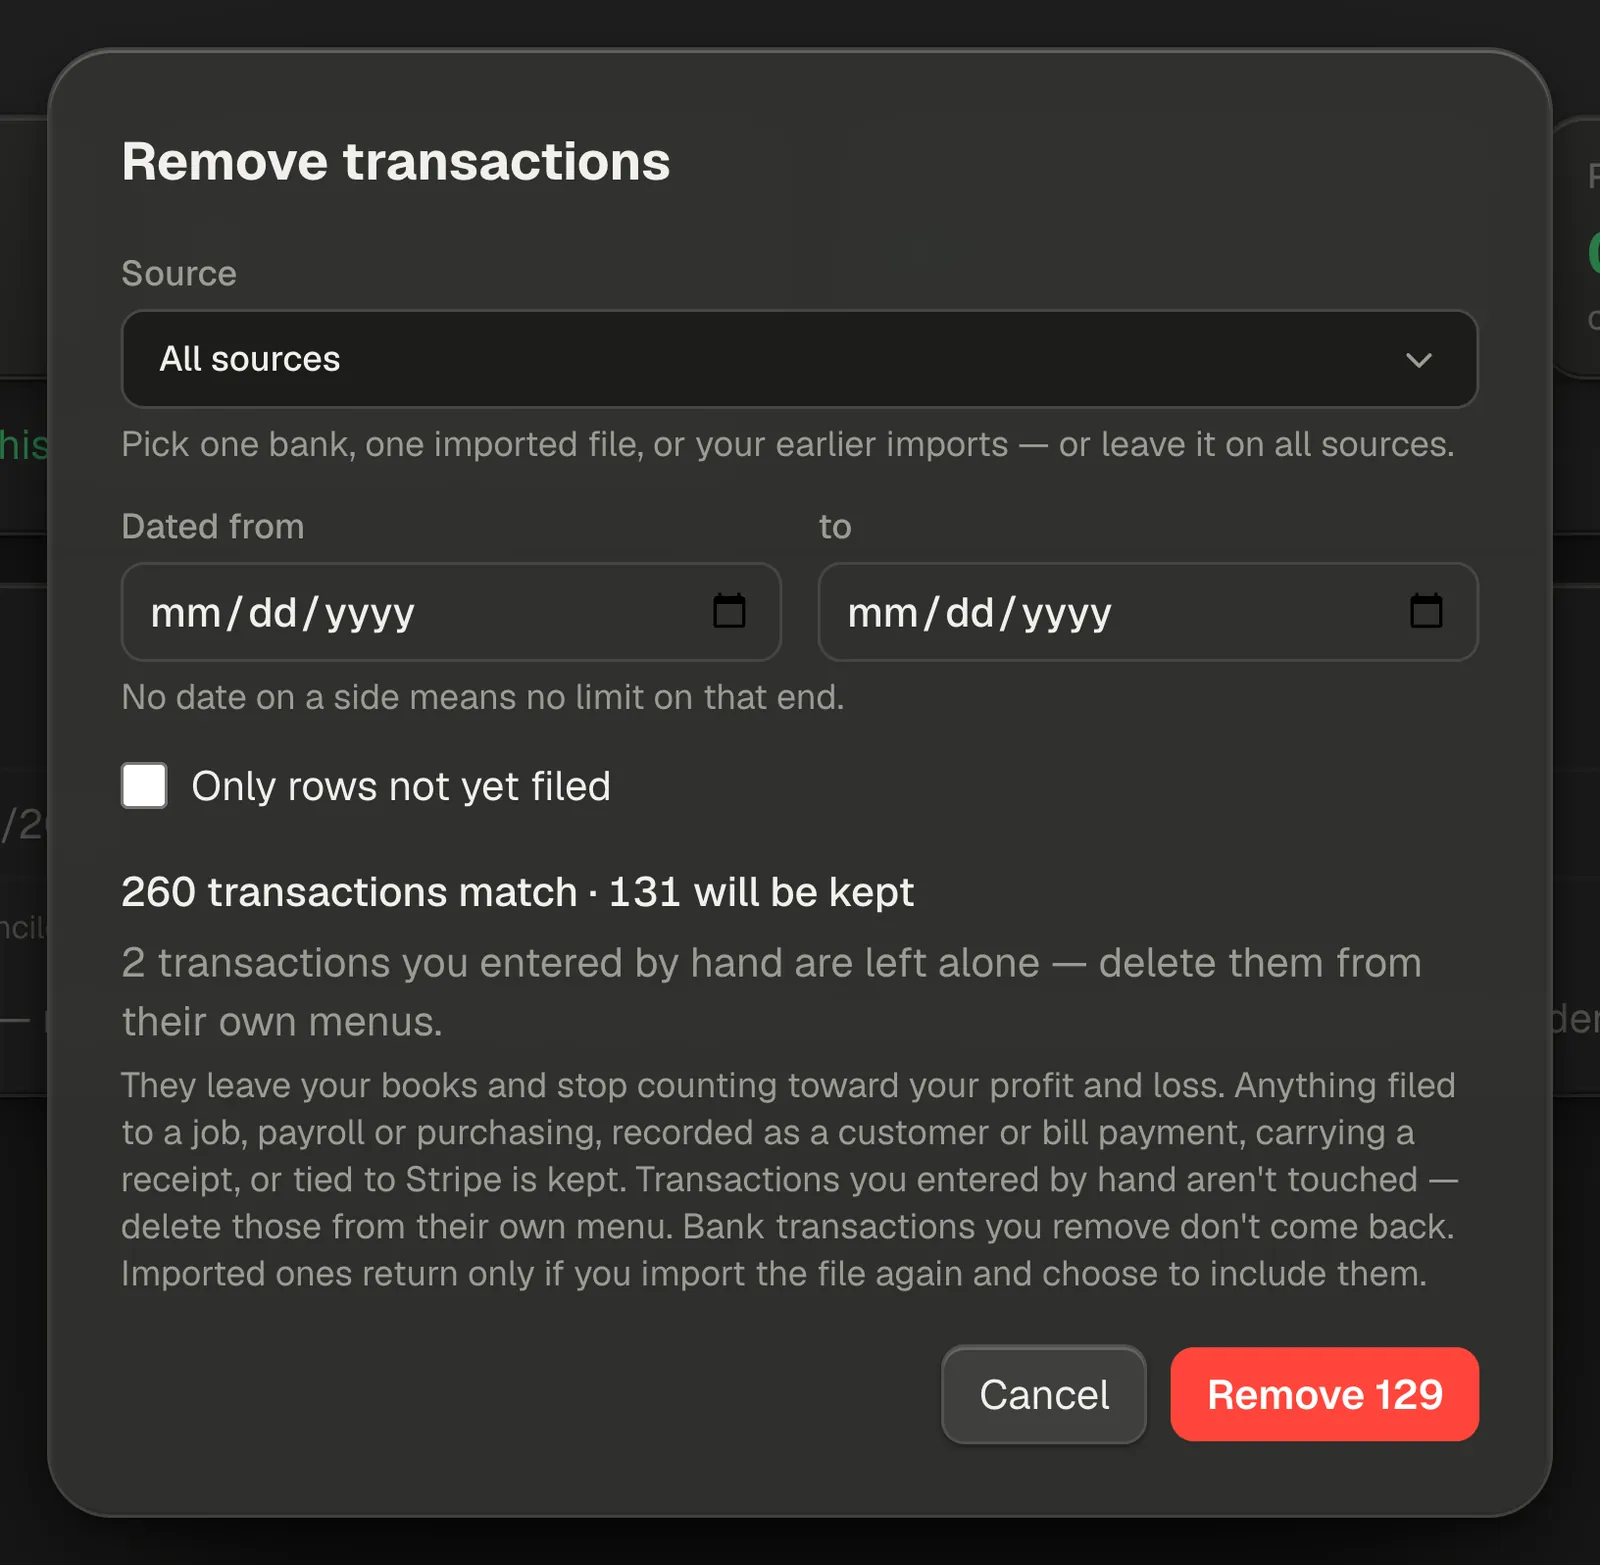
Note — A transaction you typed in yourself is yours to edit and delete outright, with Edit and Delete on the row. Remove transaction… is for the rows that came from a bank or from a file, which is why the two look different — and why Remove (N) and Remove transactions… leave hand-entered rows where they are.
Step 9 — Import transactions
Import opens two doors for history that did not come through a connected bank.
Under Coming from QuickBooks?, export a General Ledger, a Balance Sheet Detail, or a Transaction Detail by Account and upload it exactly as QuickBooks made it — no reshaping. CRMb reads the double-entry sections, picks out your bank accounts, and turns the categories QuickBooks filed each transaction to into CRMb categories. A step called Pick the accounts to import then shows the account sections it found, with your bank accounts already ticked: QuickBooks records every transaction twice, once in the bank account and once mirrored in the category, so importing the bank accounts alone is what keeps nothing counted double.
Keeping records somewhere else? Download the template and fill in one row per transaction. It is a spreadsheet with the five columns CRMb expects — Date, Description, Amount, Category and Type — and a second sheet explaining each one. Then Upload your filled-out file. Any spreadsheet or CSV with a header row works too; the next step matches your columns to CRMb's.
Either way you get a preview of what will land before anything is written. On that step, Import rows dated decides how much of the file to take: leave it on All dates, or give it a from and a to — a side left blank has no limit on that end, and the line under the control says what it is doing. The counts underneath — Transactions, Overhead, Income, Excluded and To sort — move as you change the dates, so you can see the effect before you commit. Nothing is dropped quietly: rows outside the range are counted under Excluded and listed among the rows that need a look, each with the reason Outside your date range.
Anyone who can open Accounting can import, including the Accounting role and an outside CPA.
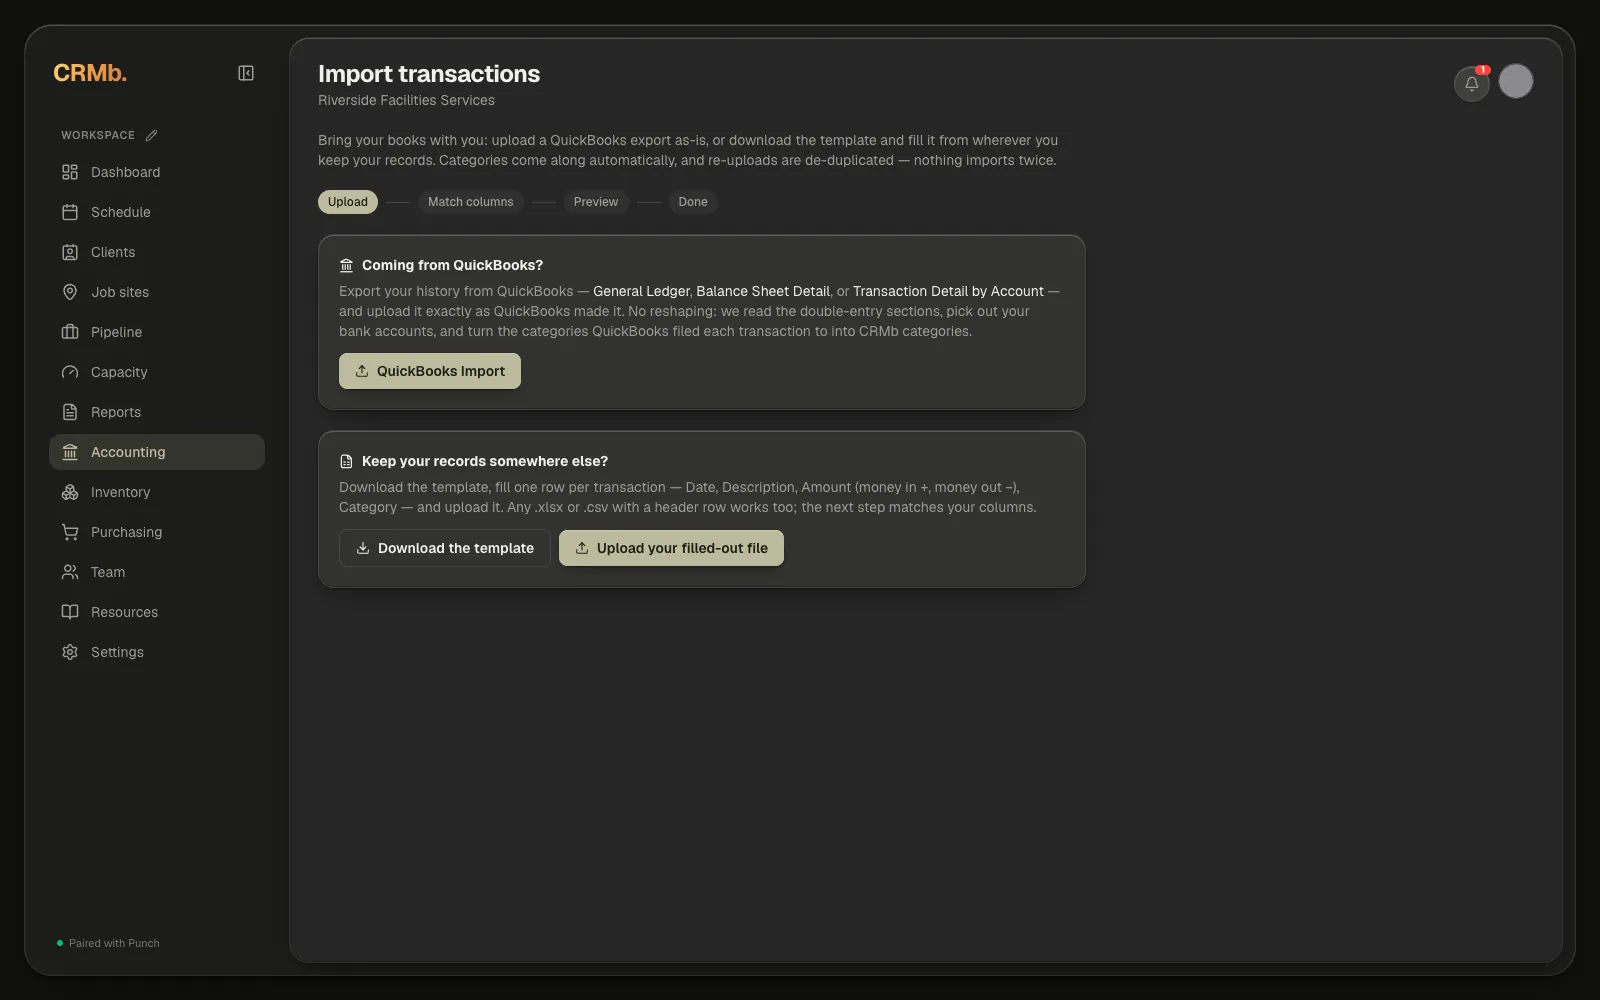
Note — Re-uploading the same file is safe. Rows that are already in your books are skipped, whether they came from QuickBooks or the template. Rows you removed on purpose (Step 8) are skipped as well, and the result says so: it counts them as "rows skipped — you removed these earlier", names them by their row number in your file, and offers Include them anyway to bring back just those if you have changed your mind. Bringing removed rows back is for owners and managers, the same people who can remove them; anyone else reads An owner or manager can bring these back. in its place.
Step 10 — Review what's already filed
Switch to Completed for everything that has been filed inside the window, grouped by where it went: Filed expenses, Categorized income, Payroll, Purchases, Recorded deposits, and the skipped rows folded away at the foot. Search transactions in the card header narrows every group at once — it is the same box as on Transactions, and each tab keeps its own text. The window controls at the top of the page work here exactly as they do on Transactions.
Underneath the groups, Operating spend by category and Bank spend on jobs total the window — the first counted in your net margin, the second in each job's.
Every filed row keeps its pencil, so a misfiling is fixed where you find it rather than hunted down somewhere else.
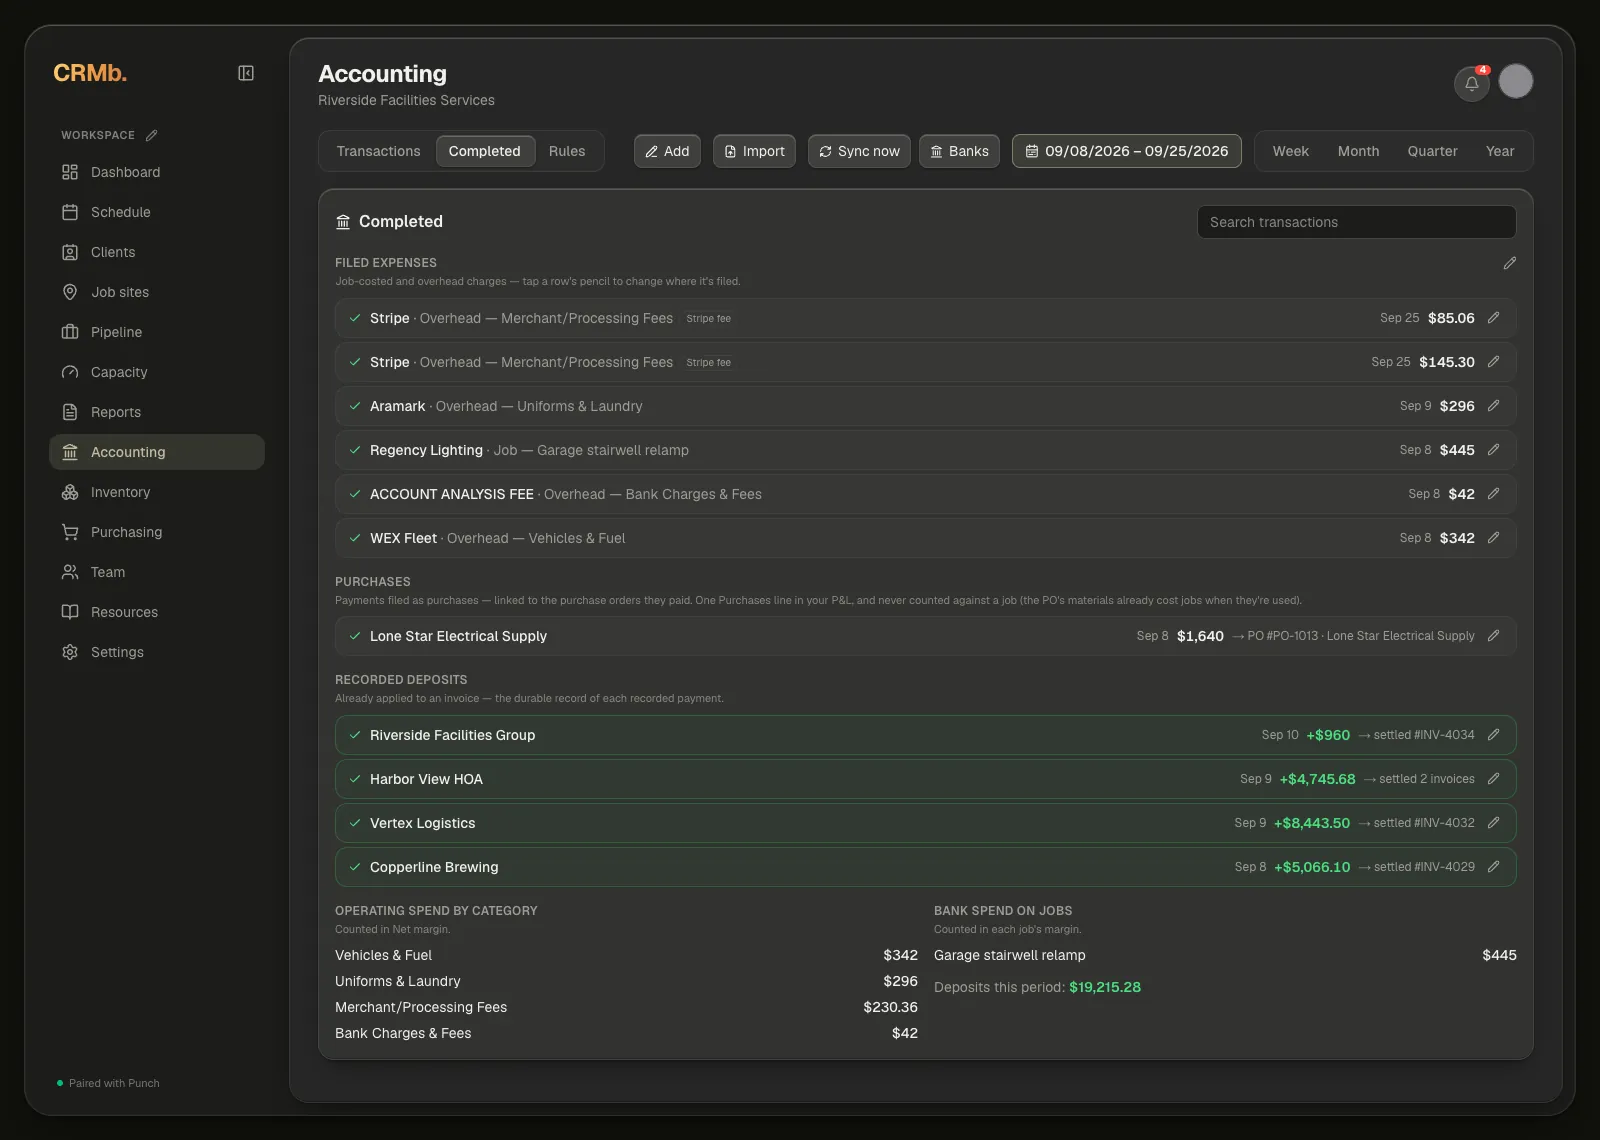
Note — If your clients pay invoices online, two kinds of row arrive here on their own. The processing fee Stripe keeps from each payment is filed as an expense and tagged Stripe fee. It stays an expense: its pencil offers Change category and receipts, nothing more, and it can't be skipped, moved back to review or removed. And when a bank deposit matches a payout from Stripe, CRMb files it with the skipped rows, marked Stripe payout — the money in it was already counted as income when each client paid.